Tracking iframe widgets with Usermaven
Hello from the Usermaven team! We know that many modern websites use iframe widgets for everything from video players and calendars to embedding entire sections of an application. Tracking user interactions within these iframes is key to understanding the full customer journey. This guide will walk you through the different methods to effectively track iframe content with Usermaven, step by step.
Prerequisites
Usermaven script on your main website: Ensure the core Usermaven tracking snippet is correctly installed on all pages of your primary website where iframes are embedded or where users might navigate from an iframe.
Identify iframe content source: Determine if the content loaded into the iframe comes from:
A domain you also own and control (e.g.,
app.yourdomain.comembedded inwww.yourdomain.com).A third-party domain where you cannot place your own scripts (e.g., YouTube, a Calendly embed).
This distinction will guide you to the best tracking method.
Method 1: Comprehensive tracking for iframes on domains you control
This method offers the most detailed tracking, including autocaptured events, when the iframe loads content from another domain that you own.
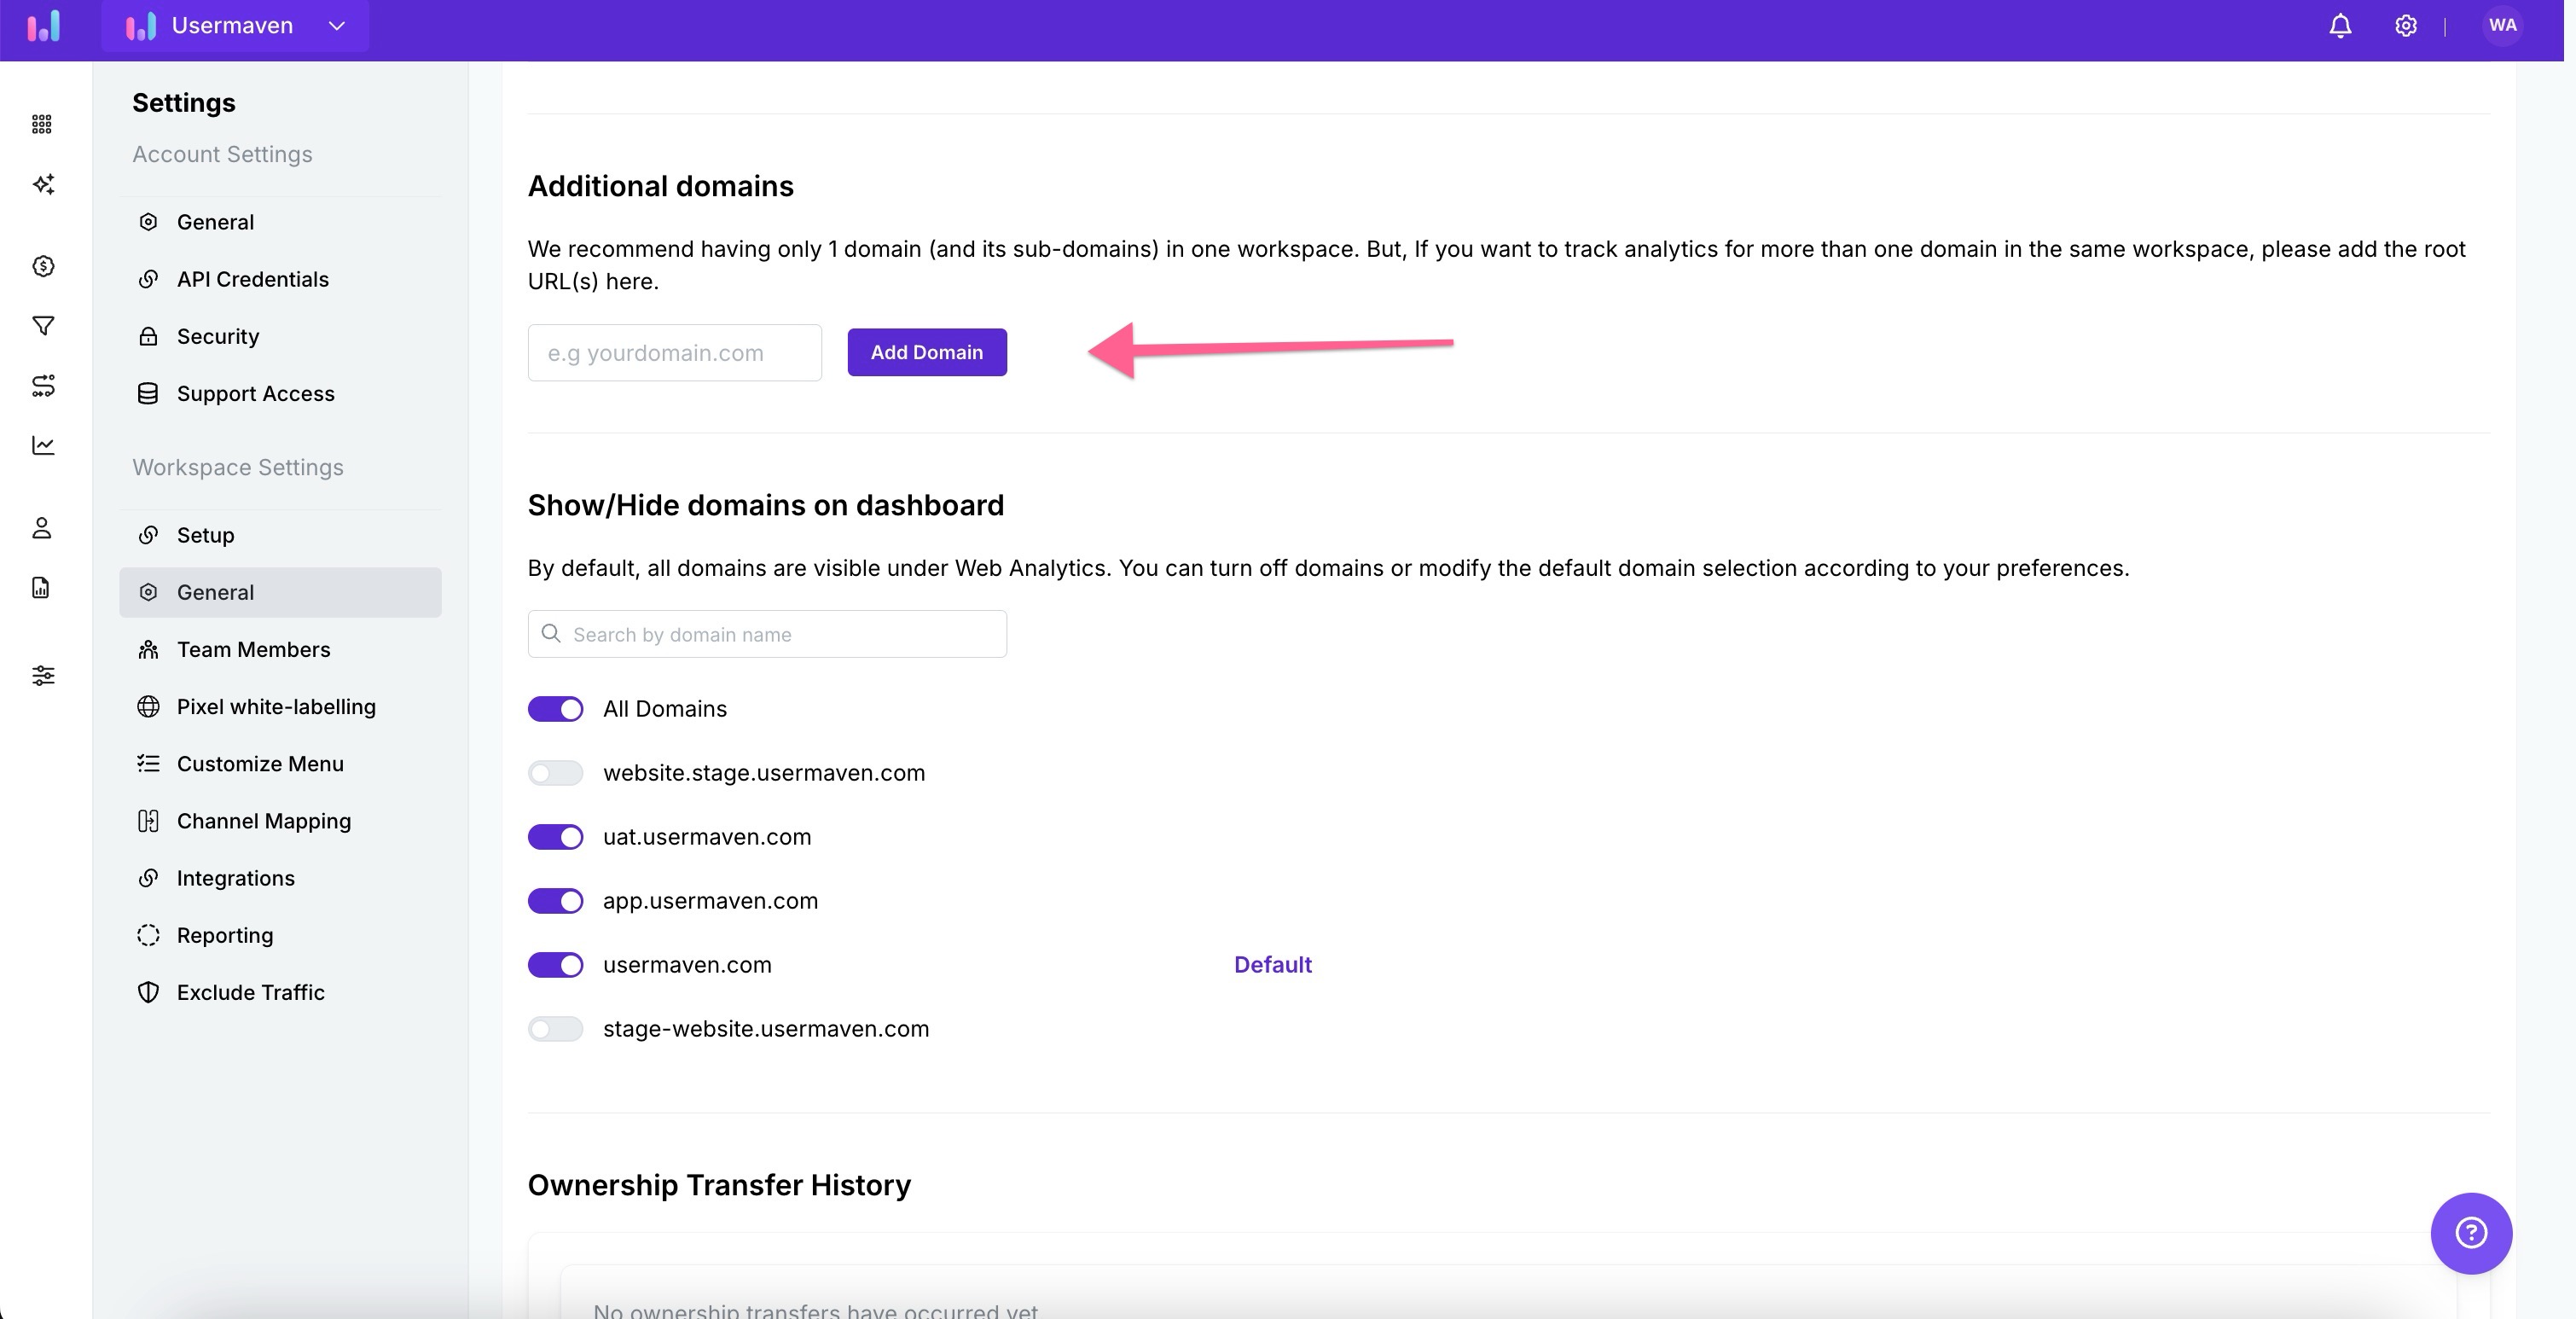
Step 1: Add the iframe's domain in your Usermaven Workspace Settings\*\*
It's crucial to tell Usermaven about all the domains that are part of your digital presence.
Action: In your Usermaven dashboard, navigate to
Workspace Settings > General > Additional domains. Add the domain that serves the content for your iframe here (e.g.,app.yourdomain.com).Why: This officially links the data from your iframe's domain to your main workspace, ensuring that activity is correctly attributed and that all Usermaven features, including session unification and event tracking, function as expected for content on this additional domain.
Step 2: Install the Usermaven tracking script inside the iframe content
For Usermaven to directly "see" and record activity within the iframe, its script needs to be present there.
Action: Place the standard Usermaven tracking snippet within the HTML
<head>section of the pages that are served into the iframe from your controlled domain. Ensure that theautocapturesetting in your tracking pixel is set totrueif you want to leverage automatic event capturing for button clicks and other interactions within the iframe.Why & Benefits:
Detailed insights: This allows Usermaven to track page views, user interactions, and custom events happening directly within the iframe environment.
Autocapture technology: Crucially, with the script installed inside the iframe on your controlled domain (and autocapture enabled), Usermaven's powerful autocapture feature will automatically detect and track frontend events like button clicks and form submissions (if not already custom-tracked) happening within the iframe. This provides granular data with minimal setup.
Step 3: Enable and configure cross-domain tracking
To link a user's session seamlessly as they move between your main website and the content within the iframe (and vice-versa), cross-domain tracking is essential.
Action:
On the Usermaven script tag located on your parent page (the one embedding the iframe), add the following attributes:
data-cross-domain-linking="true"data-domains="your-main-site.com,your-iframe-content-domain.com"(Replace with your actual domains, comma-separated).
If the content within your iframe also links out to other domains you own and want to track in the same session, ensure the Usermaven script inside the iframe also has these attributes configured appropriately.
How it works: When a user navigates between these linked domains, Usermaven appends a unique identifier (
_um=...) to the URL. The Usermaven script on the destination page (whether parent or iframe) reads this, ensuring a continuous session.Important: This feature relies on cookie-based tracking. Learn more about cross-domain tracking in Usermaven.
Step 4: Track specific custom events (optional but recommended)
While autocapture handles many common interactions, you might have specific custom events you want to track within the iframe.
Action: Directly within the JavaScript of your iframe's content, use
usermaven("track", "Your Custom Event Name", {custom_properties})to send specific interaction data to Usermaven. Learn more about sending custom events.Example: If a user completes a multi-step process within the iframe application, you can send an event like
usermaven("track", "Application Step Completed", {step_number: 3}).
Method 2: Tracking third-party iframes via API communication
This method is for iframes loading content from third-party services where you cannot install your Usermaven script (e.g., YouTube, Wistia, certain functionalities of embedded tools like HubSpot Meetings). Tracking relies on the parent page communicating with the iframe using the third party's provided tools.
Step 1: Check if the third-party widget offers a JavaScript API
Many embeddable services provide APIs that allow your parent page to listen to events happening inside their iframe.
Action: Consult the documentation for the third-party service to see if they offer a JavaScript Player API, Embed API, or use
postMessageevents.
Step 2: Implement event listeners on your parent page
Your main website's JavaScript will listen for these events.
Action: Add custom JavaScript to your parent page that uses the third-party's API to detect specific interactions (e.g., video play, pause, progress, form submission within the iframe).
Step 3: Send interaction data to Usermaven from your parent page
When your parent page's script detects an event from the iframe, it then tells Usermaven about it.
Action: Call
usermaven("track", "ThirdParty Event Name", {event_properties})from your parent page's JavaScript. Learn more about sending custom events.Examples:
For YouTube: Learn more about YouTube engagement tracking.
For Wistia: Learn more about tracking Wistia engagements.
For HubSpot Meetings (advanced): Some embed options allow listening for
postMessageevents from the iframe. Learn more about tracking HubSpot Meetings.
Method 3: Tracking via redirection to a thank you page
This is a straightforward and often very effective method, especially for tracking the completion of a goal (like a booking) or when the iframe service doesn't offer a robust API and you can't place your script inside it.
Note: With this method, you will not be able to track page views, autocaptured events or custom events that happen within the iframe itself. Only the final conversion (the visit to your thank you page) is tracked.
Step 1: Configure the iframe service to redirect upon completion
Set up the third-party service to send the user back to a page on your main domain once they've completed the key action within the iframe.
Action: In the settings of the third-party tool (e.g., Calendly, HubSpot Meetings), specify a "redirect URL" or "thank you page URL" that points to a dedicated confirmation page on your website (e.g.,
www.yourdomain.com/thank-you-for-booking).
Step 2: Ensure Usermaven tracks the thank you page view
Since this thank you page is on your main domain (where your Usermaven script is already installed), the page view will be automatically tracked.
Action: No extra Usermaven setup is needed for this step, beyond having the main script on your site.
Step 3: Set up a conversion goal in Usermaven (recommended)
To easily measure and report on these conversions:
Action: In Usermaven, define a conversion goal based on visits to this specific thank you page URL.
Examples: This is a common method for tracking Calendly bookings and a primary method for tracking HubSpot Meetings.
Verifying your iframe tracking
Once you've set up tracking for your iframe widgets, it's important to verify that data is flowing into Usermaven correctly. Here are a couple of ways to do that:
Check web analytics for the iframe domain (if applicable):
If you've used Method 1 (for domains you control and added as an additional domain), navigate to the Web Analytics module in your Usermaven dashboard.
Use the domain dropdown selector at the top of the page to choose your iframe's domain.
You should start seeing pageviews and any autocaptured or custom events originating from this domain. This confirms that the script inside the iframe is working and sending data.
Inspect events activity:
Navigate to Configure > Events Activity in your Usermaven dashboard.
This section provides a real-time (or near real-time) log of all incoming events. Look for events that you expect to be generated by interactions within your iframe.
You can filter by event name or look at the properties of incoming events to confirm they are from the iframe widget or domain. For example, custom events sent from an iframe via API (Method 2) will appear here.
If you don't see the expected data, revisit the setup steps for your chosen method, paying close attention to script placement, cross-domain linking attributes, domain configuration in workspace settings, and any custom JavaScript for API communication.
Leveraging your iframe tracking data
Once your iframe widget tracking is active and verified, you can unlock powerful insights and actions within Usermaven:
Utilize pinned events from autocaptured data:
If you're using Method 1 and have autocapture enabled (
autocapture: truein the tracking pixel), Usermaven will automatically pick up interactions like button clicks within your iframe.You can then promote these autocaptured interactions to Pinned Events for easier analysis and use in reports. This gives a name to anonymous clicks (e.g., "Clicked 'Submit Application' button in iframe").
Learn more about creating Pinned Events.
Create conversion goals, funnels, and journeys:
Identify key actions within your iframe that signify a conversion (e.g., a booking made, a form submitted, a video fully watched).
Use the custom events you're tracking (or Pinned Events from autocaptured data) to define Conversion Goals.
Build Funnels to visualize how users progress through steps that might occur both on your main site and within the iframe.
Analyze User Journeys to understand the complete path users take, including interactions with your iframe content.
Incorporate into attribution analysis:
If conversions are happening within your iframe (e.g., a lead form submission), use the conversion goals you've created in Usermaven's Attribution Analysis.
This will help you understand which marketing channels and campaigns are driving these valuable iframe interactions.
Learn more about marketing channel and source attribution.
Build custom trends and dashboards:
Track the performance of your iframe interactions over time by creating Trendsreports based on your pinned or custom events.
Add these trends and other relevant metrics to custom Dashboards to monitor the engagement and effectiveness of your iframe widgets at a glance.
By taking these steps, the data from your iframe widgets becomes an integral part of your overall analytics strategy, providing deeper insights into user behavior and conversion pathways.
Summary and key takeaways
Successfully tracking iframe interactions in Usermaven hinges on a few key principles:
Understand your iframe source: Whether you control the iframe's domain dictates the most effective tracking method.
Strategic script placement & configuration: For owned domains, having the script in both the parent and iframe, adding the iframe domain to workspace settings, and ensuring autocapture is enabled are crucial for deep insights.
Leverage cross-domain tracking: Essential for unifying sessions across your owned domains.
Utilize APIs or redirection: Your go-to methods for third-party iframes.
Verify your setup: Always check that data is flowing as expected.
Act on your data: Use the collected iframe interaction data to build goals, funnels, attribution models, and dashboards to enhance your understanding of user behavior.
By following these steps, you can gain a comprehensive view of user engagement across your entire web presence, including vital interactions happening within iframe widgets.
If you have any questions or need further assistance setting up your iframe tracking, please don't hesitate to reach out to our support team via in-app chat or email! We're here to help you get the most out of Usermaven.
Was this article helpful?