WooCommerce
Unlock powerful e-commerce insights and track customer journeys seamlessly by integrating Usermaven with your WooCommerce store. This guide will walk you through installing the Usermaven WordPress plugin, configuring it, and leveraging pre-built dashboards and conversion goals to understand your store's performance.
Benefits
Automated Event Tracking: No need for manual coding to track crucial WooCommerce actions.
Deep Customer Insights: Understand how users interact with your products, checkout process, and more.
Data-Driven Decisions: Optimize your store based on real user behavior.
Attribution Analysis: See which campaigns and channels are driving conversions.
Pre-built Dashboards & Conversion Goals: Get started quickly with curated views of your most important metrics.
Prerequisites
An active Usermaven account.
A WordPress website with WooCommerce installed and active.
Steps for WooCommerce integration
By following these steps, you'll be able to track WooCommerce events and gain valuable insights into your store's performance.
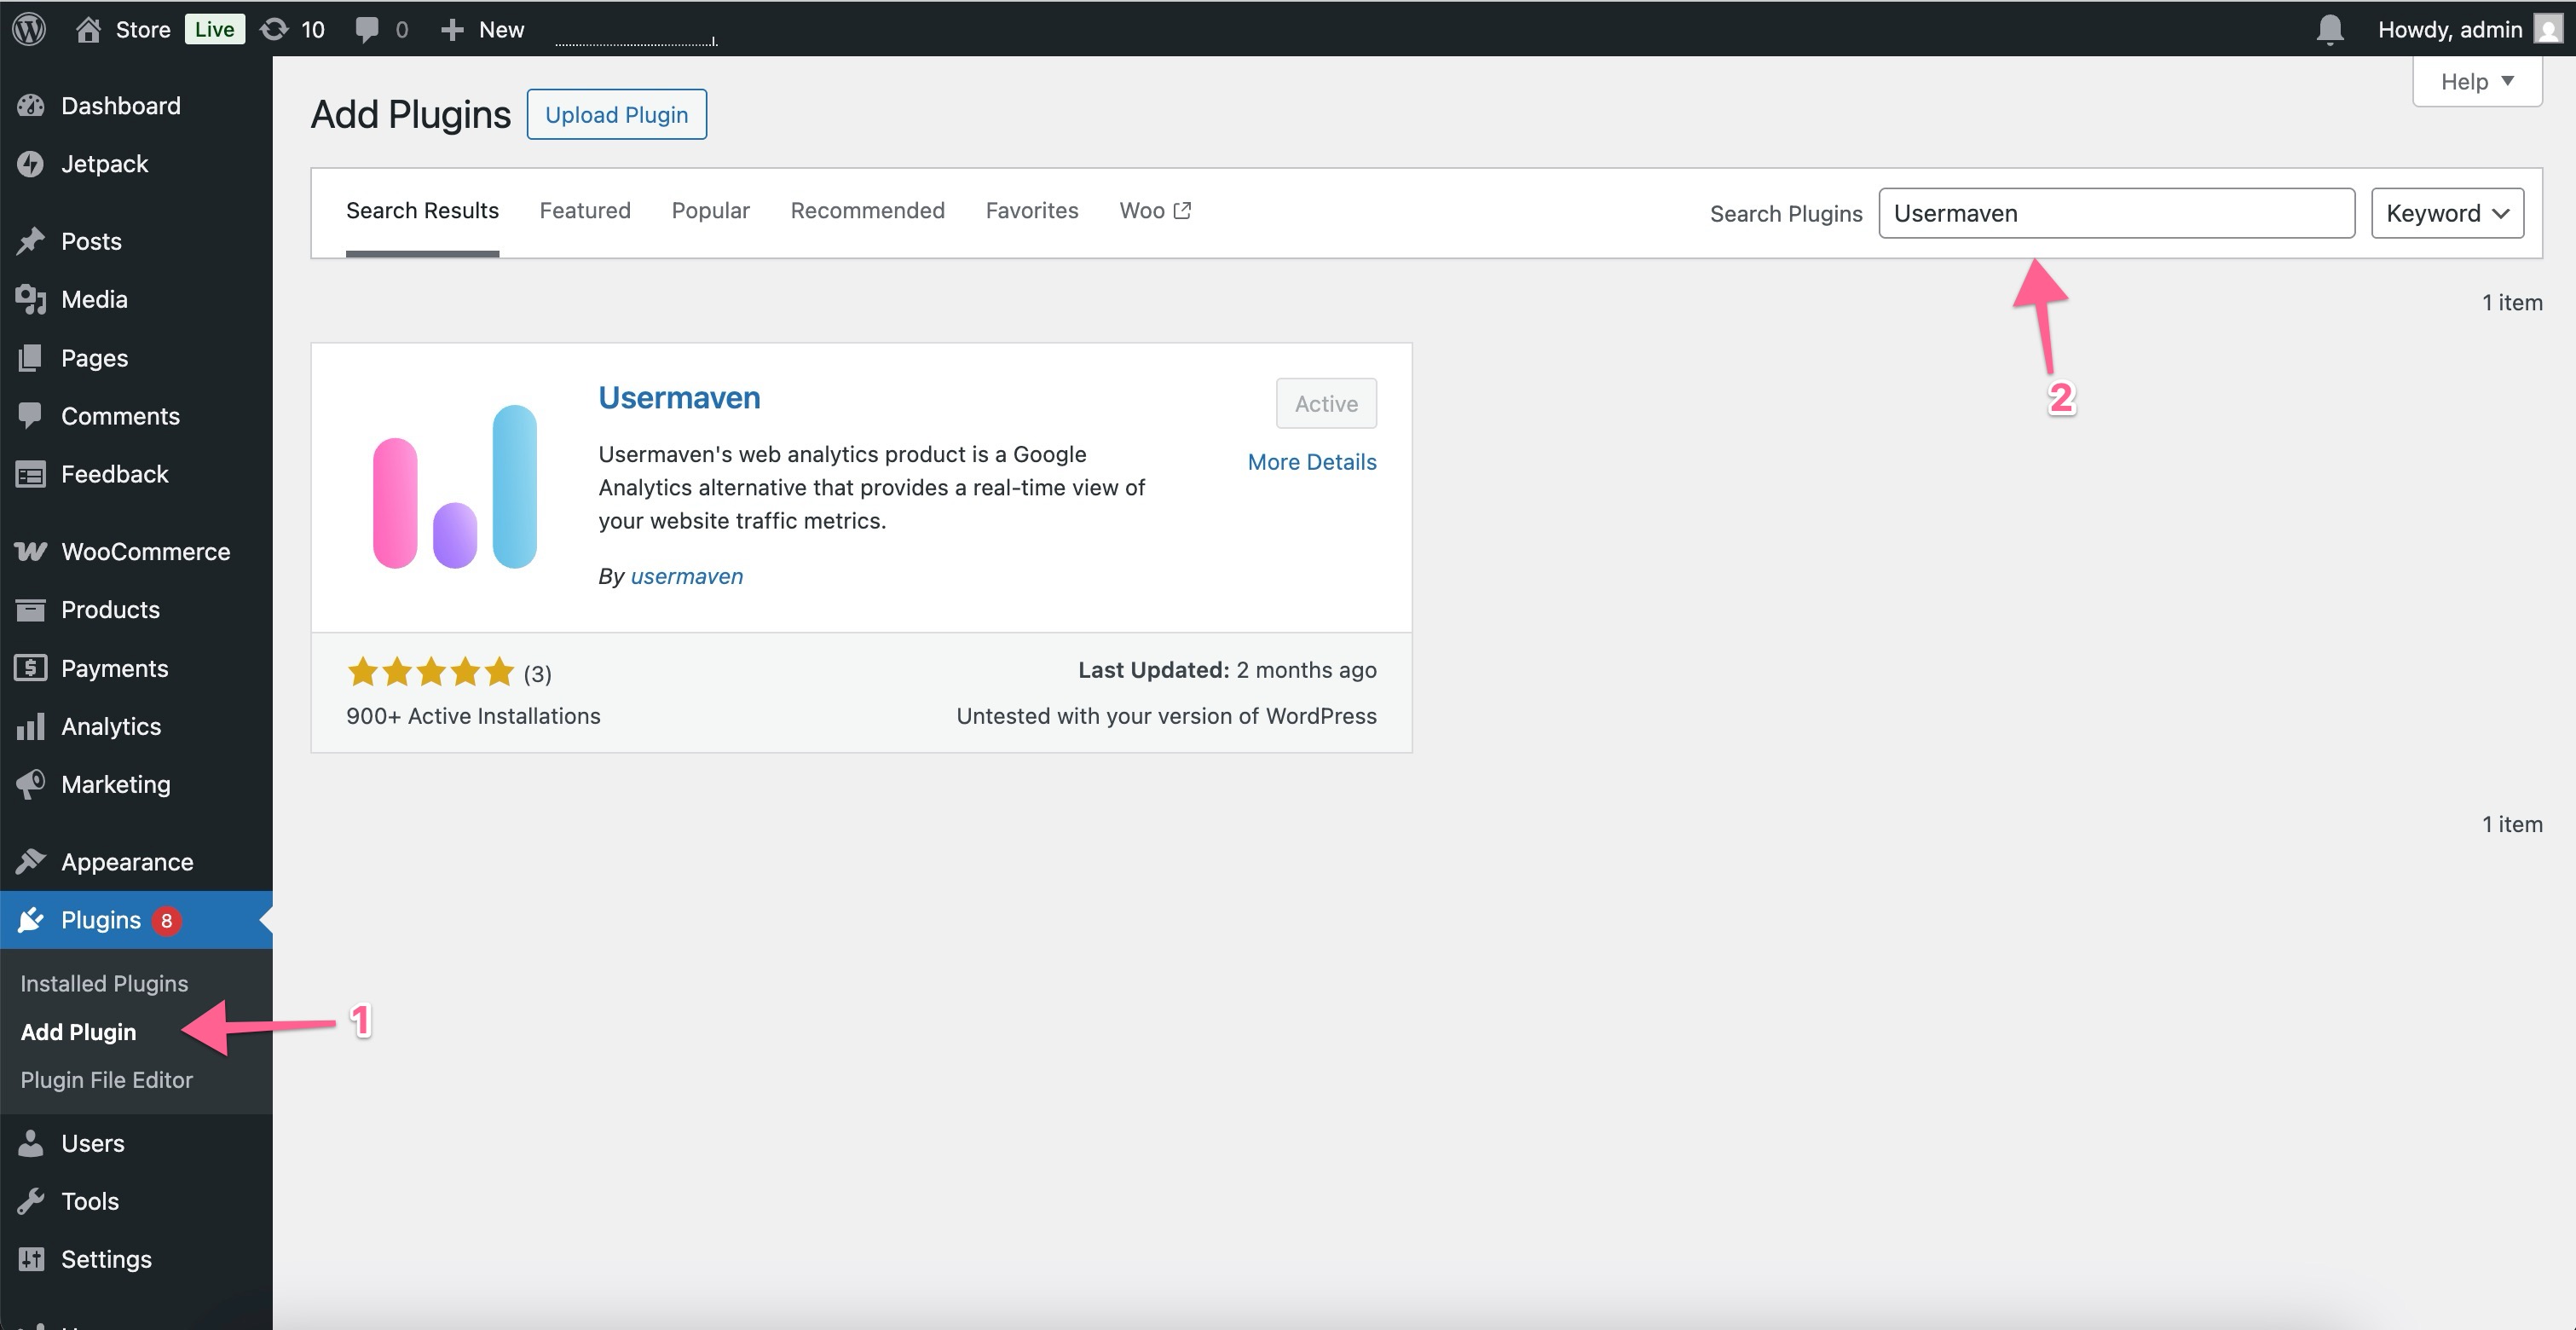
Step 1: Install the Usermaven WordPress plugin
In your WordPress admin dashboard, navigate to Plugins > Add New.
In the "Search Plugins" field on the right, type "Usermaven".
Locate the "Usermaven" plugin in the search results.
Click "Install Now" and then "Activate" the plugin.
Step 2: Configure the Usermaven plugin settings
Once activated, you need to connect the plugin to your Usermaven workspace.
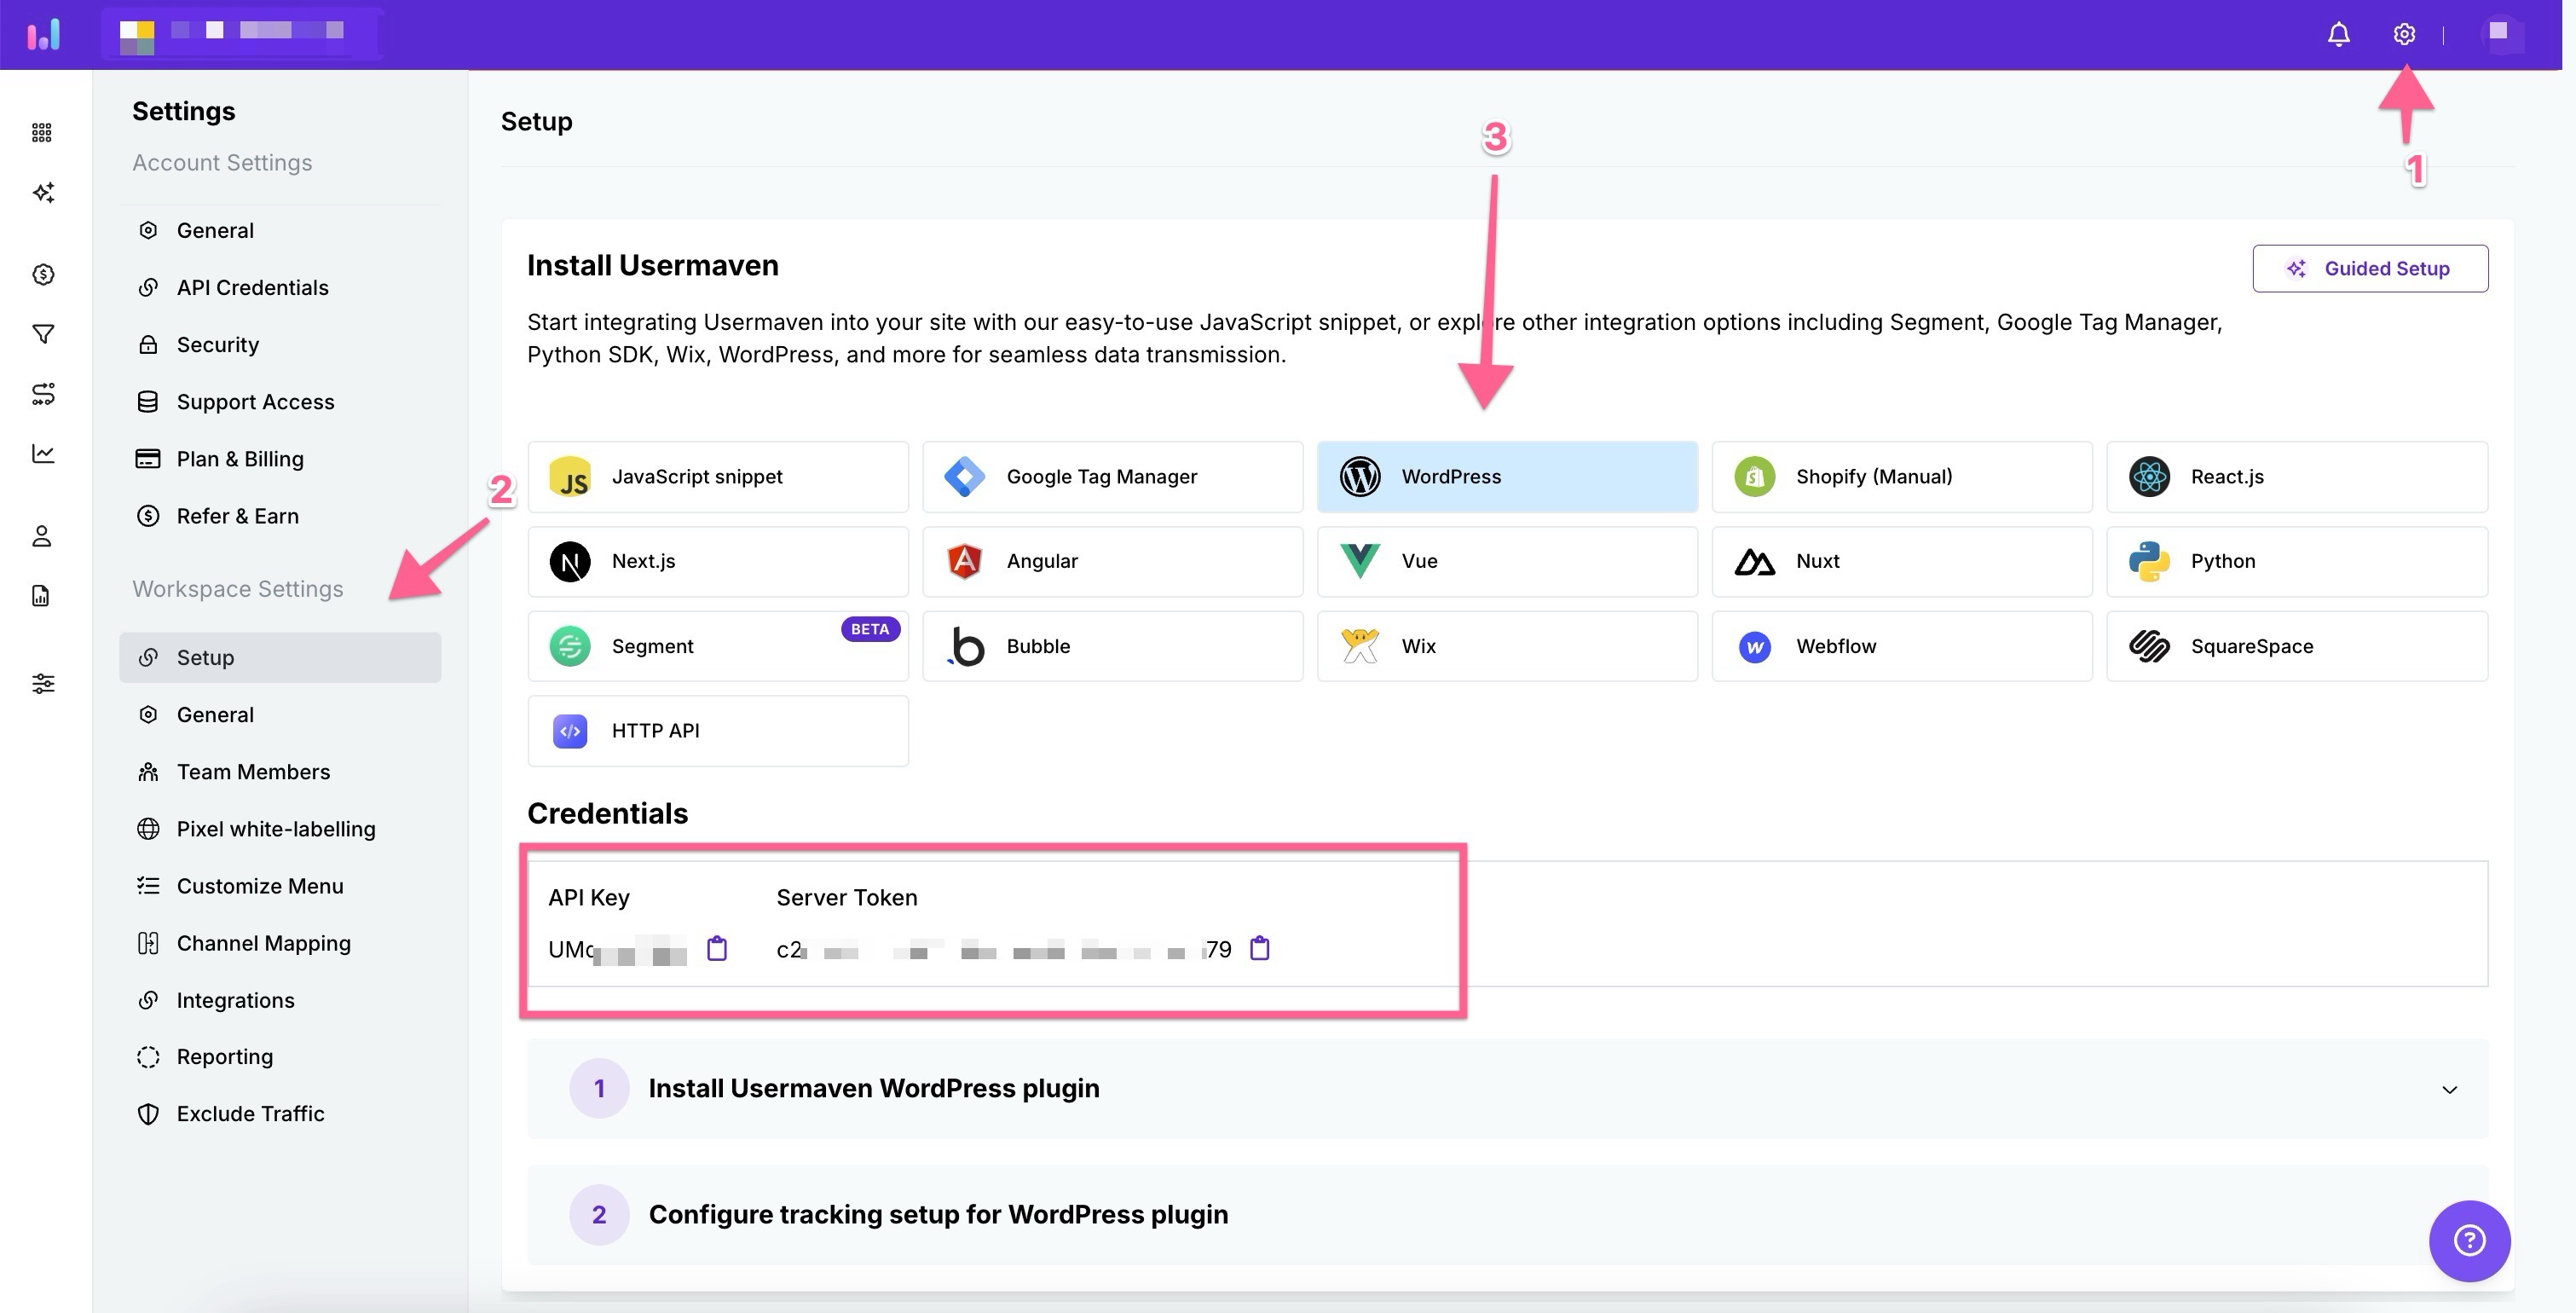
Retrieve API credentials from Usermaven:
Log in to your Usermaven account.
Click on your Profile/Workspace icon in the top right.
Navigate to Workspace Settings.
Under "Workspace Settings," click on Setup.
Select the WordPress integration option.
You will find your API Key and Server Token. Copy both of these values.
Configure plugin in WordPress:
In your WordPress admin dashboard, navigate to Usermaven > Settings.
Paste the API Key you copied from Usermaven into the "API Key" field.
Paste the Server Token you copied from Usermaven into the "Server Token (For server side tracking)" field.

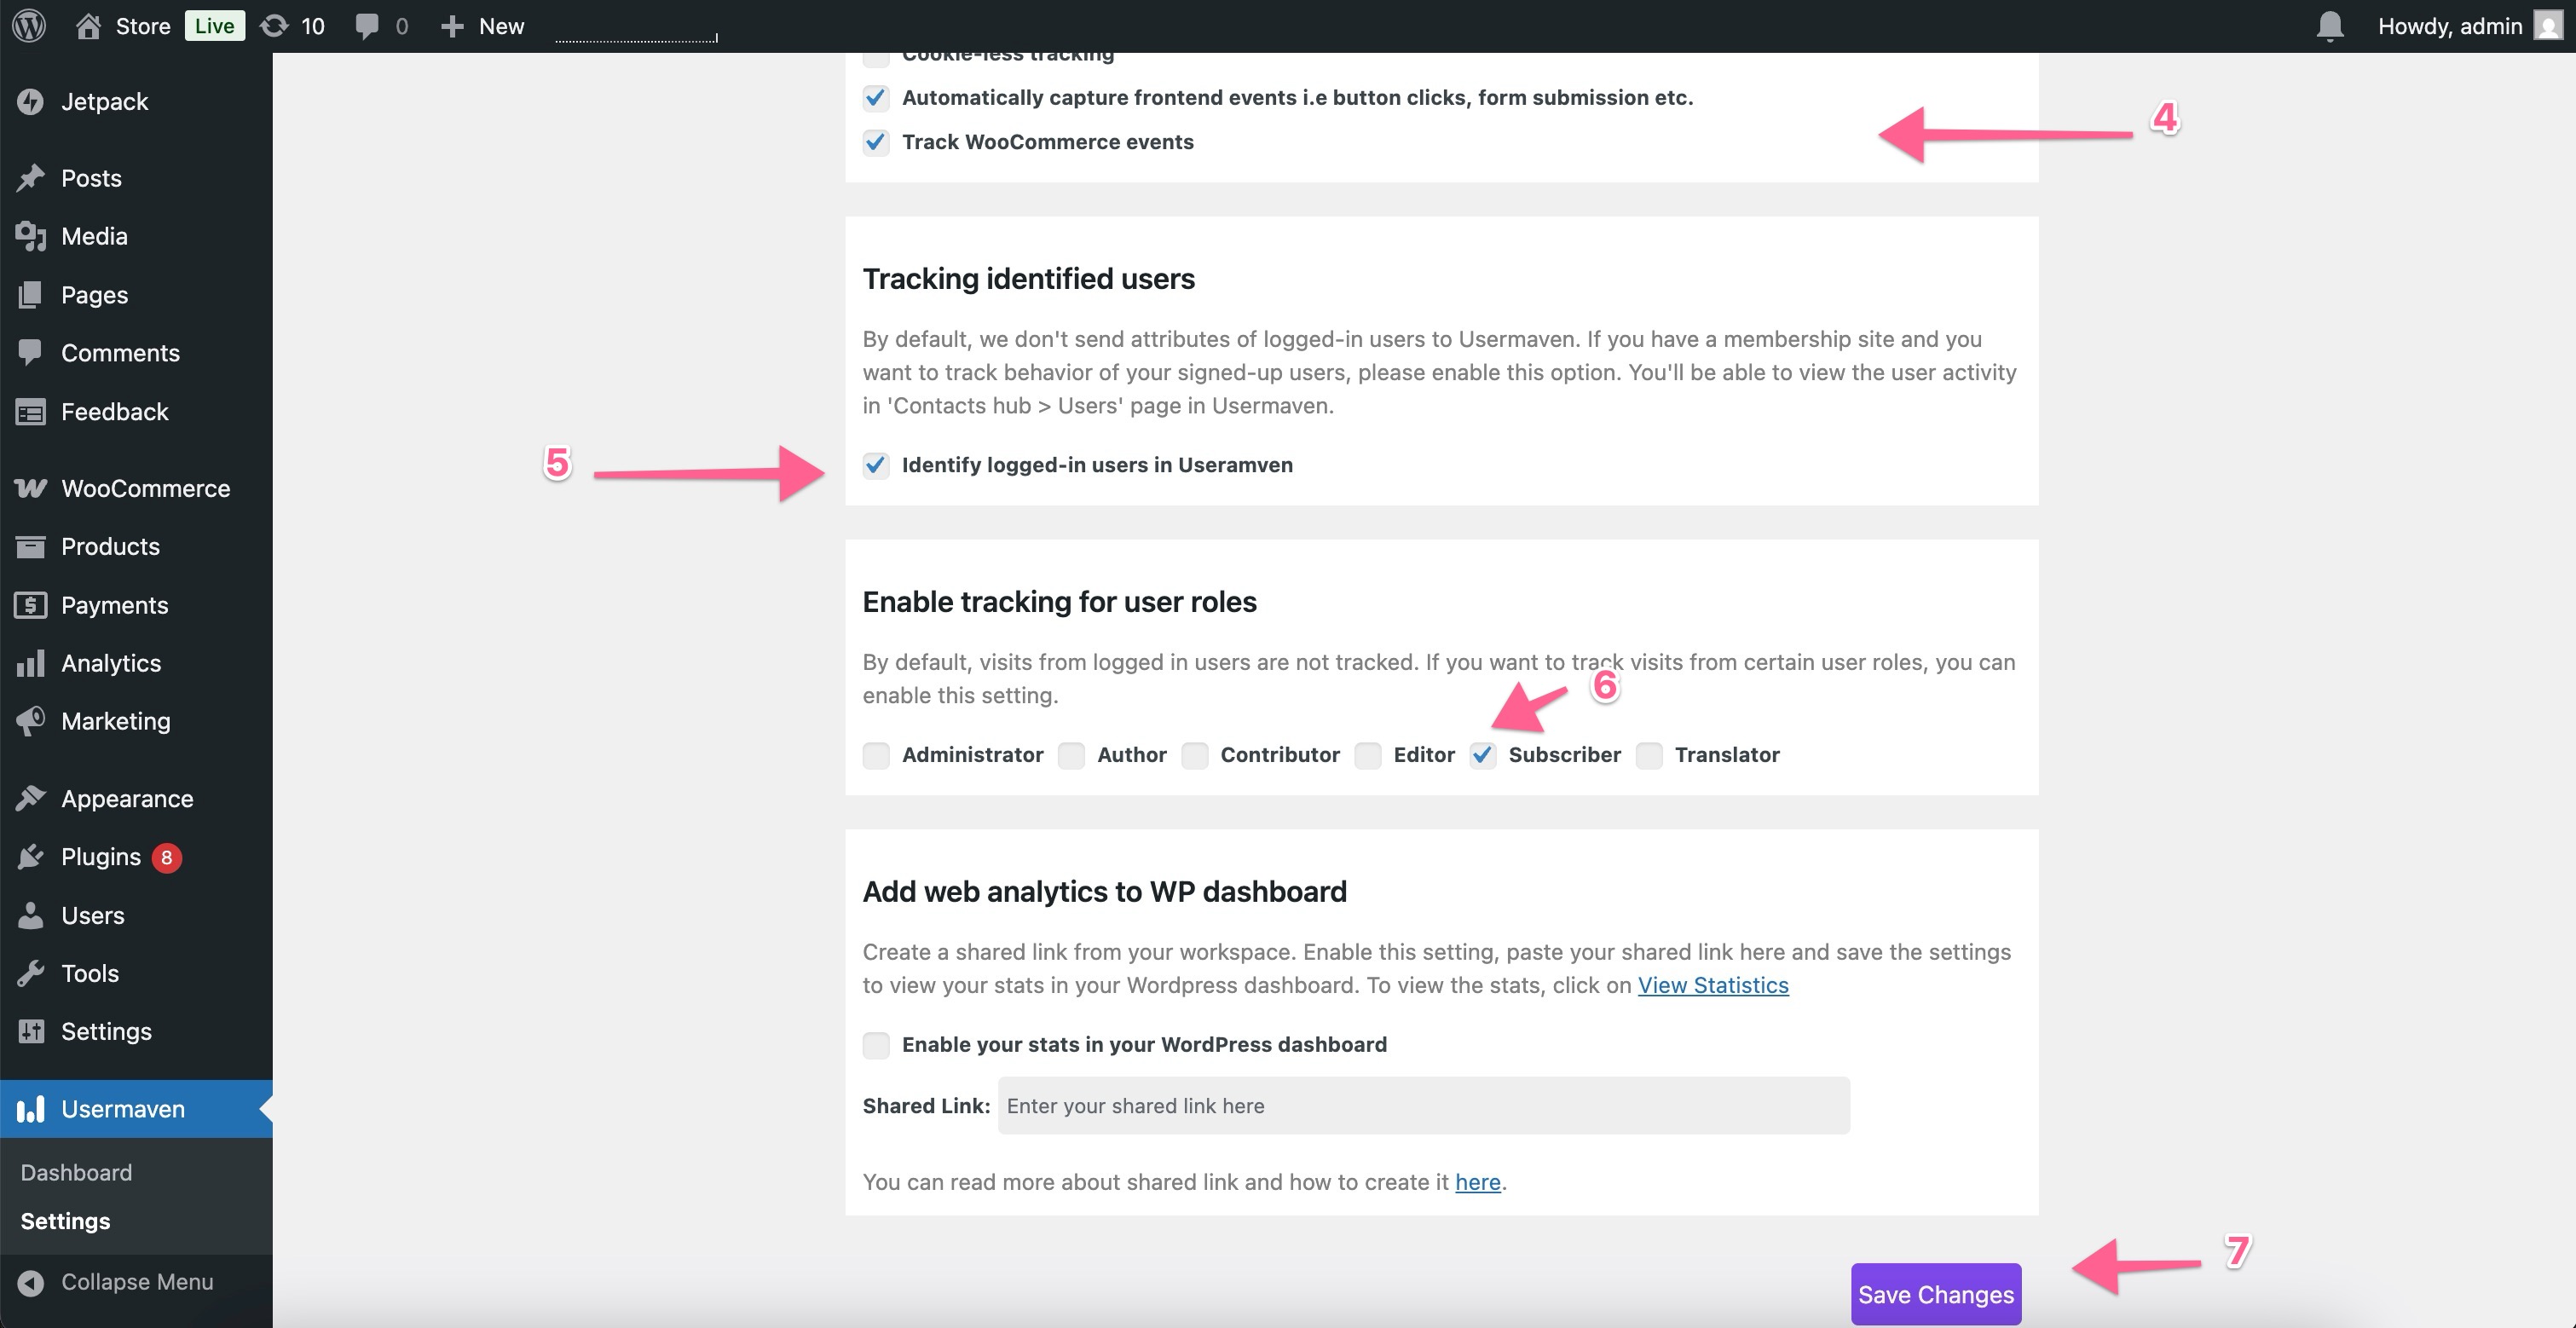
* **Review tracking options:**
* **"Automatically capture frontend events..."**: This is generally recommended to be enabled for comprehensive frontend interaction tracking (e.g., button clicks, form submissions).
* **"Track WooCommerce events"**: Ensure this option is **checked**. This is crucial for sending WooCommerce-specific events.
* **"Identify logged-in users in Usermaven"**: Enable this if you have a membership site or user accounts and want to track the behavior of signed-in users. This allows you to see individual user activity in Usermaven's "Contacts hub > Users" page.
* **"Enable tracking for user roles"**: If you only want to track visits from users with specific roles (e.g., Subscriber, Customer), select them here. By default, visits from logged-in users are not tracked unless this or the "Identify logged-in users" option is configured.
* Click **"Save Changes"**.
Step 3: Automatic WooCommerce event tracking
Once the plugin is configured correctly, it will automatically start sending important WooCommerce-related custom events to your Usermaven workspace. No manual event coding is required for these standard actions.
You can view these events and their data in your Usermaven workspace in the Configure module under Events & Goals > Custom events.
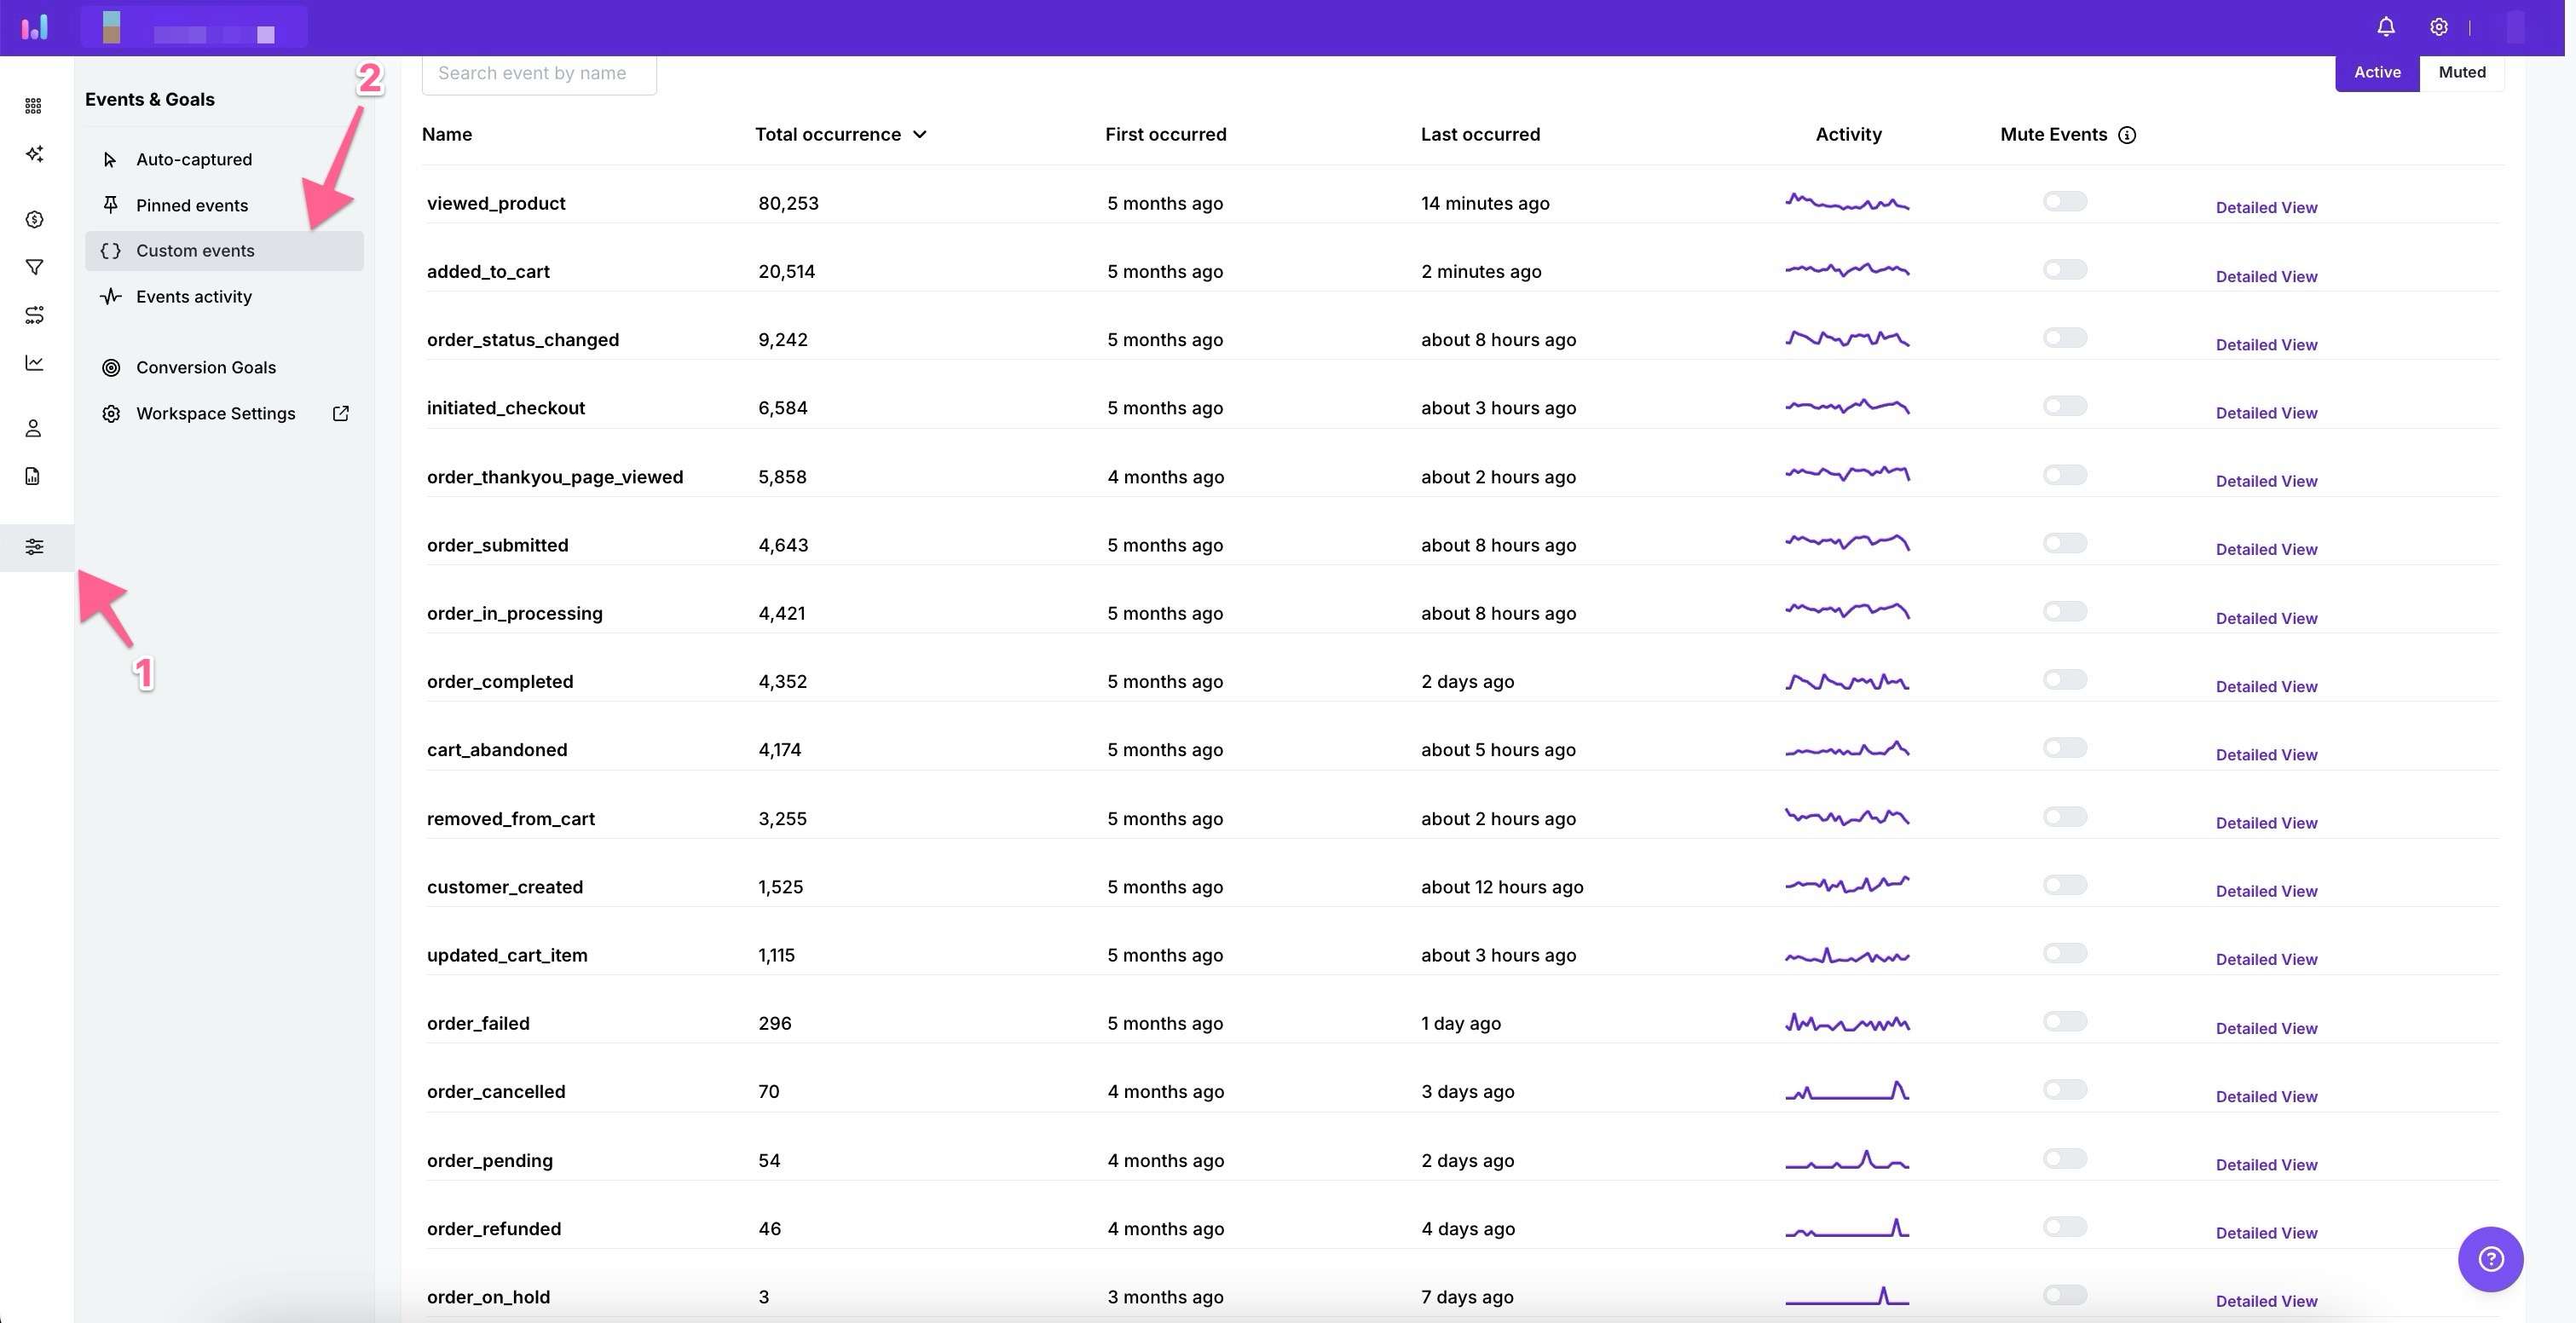
List of automatically tracked WooCommerce events & their triggers:
Event Name | Description / Trigger |
|---|---|
| Triggered when a user views a single product details page. |
| Fired when a user clicks the "Add to cart" button for a product. |
| Occurs when the status of an existing order is updated in WooCommerce (e.g., from 'pending' to 'processing', or 'processing' to 'completed'). |
| Triggered when a user proceeds to the checkout page from the cart page or a mini-cart. |
| Fired when a user successfully completes an order and is redirected to the "Thank You" or order confirmation page. |
| Triggered when a user clicks the final "Place order" (or equivalent) button during the checkout process. |
| Fired when an order is successfully placed, payment is confirmed, and the order status is set to 'processing'. Key for sales tracking. |
| Fired when an order's status is marked as 'completed' in WooCommerce, often indicating fulfillment or shipment. |
| Aims to capture instances where a user adds items to their cart but does not complete the purchase (may depend on session activity/site navigation). |
| Triggered when a user removes an item from their shopping cart. |
| Fired when a new user account is successfully registered on your WooCommerce store. |
| Occurs when a user modifies an item in their cart, such as changing the quantity. |
| Triggered if an attempted order payment fails or if there's another error preventing order completion at the final stage. |
| Fired when an order is marked as 'cancelled', either by a customer (if allowed) or an administrator. |
| Occurs when an order is placed but is awaiting payment confirmation (e.g., for bank transfers or check payments). |
| Triggered when a previously completed order is partially or fully refunded. |
| Fired when an order's status is set to 'on-hold', often requiring manual review (e.g., stock issues, fraud checks). |
Step 4: Add pre-built WooCommerce dashboards in Usermaven
Usermaven provides pre-built dashboards specifically designed for WooCommerce, allowing you to visualize your store's performance with a single click.
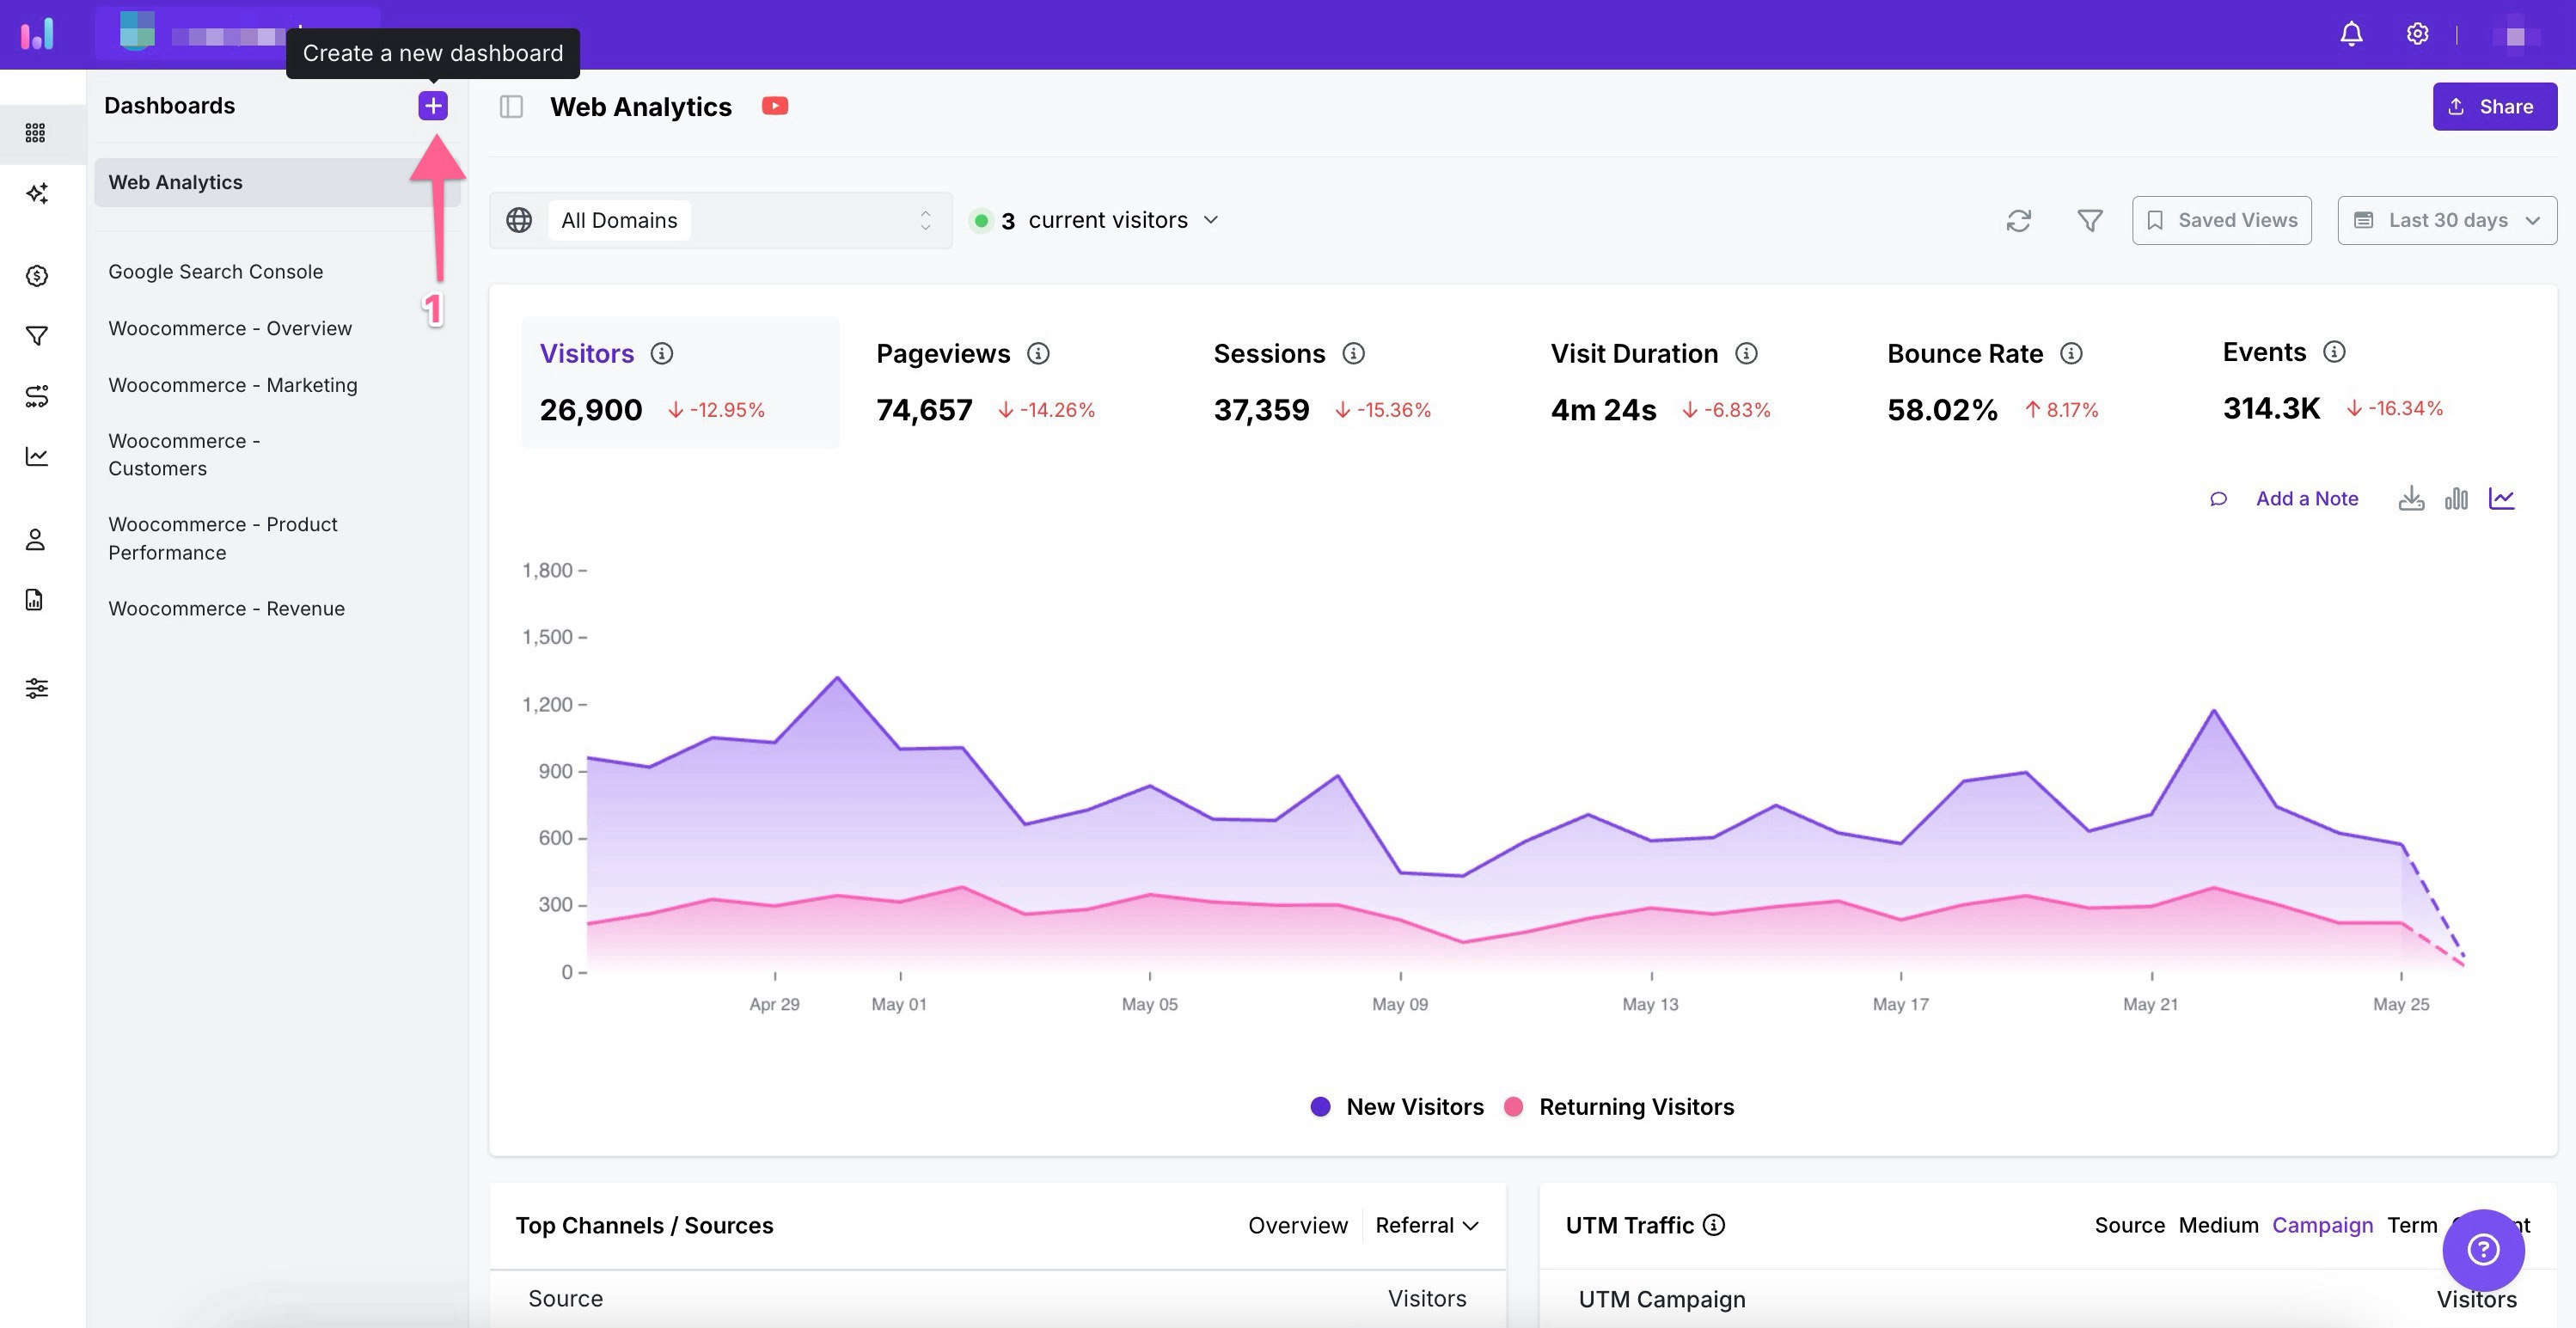
In your Usermaven workspace, navigate to the Dashboards section.
Click the "+" (Create a new dashboard) icon.
From the "Create New Dashboard" modal, select the "WooCommerce" option.
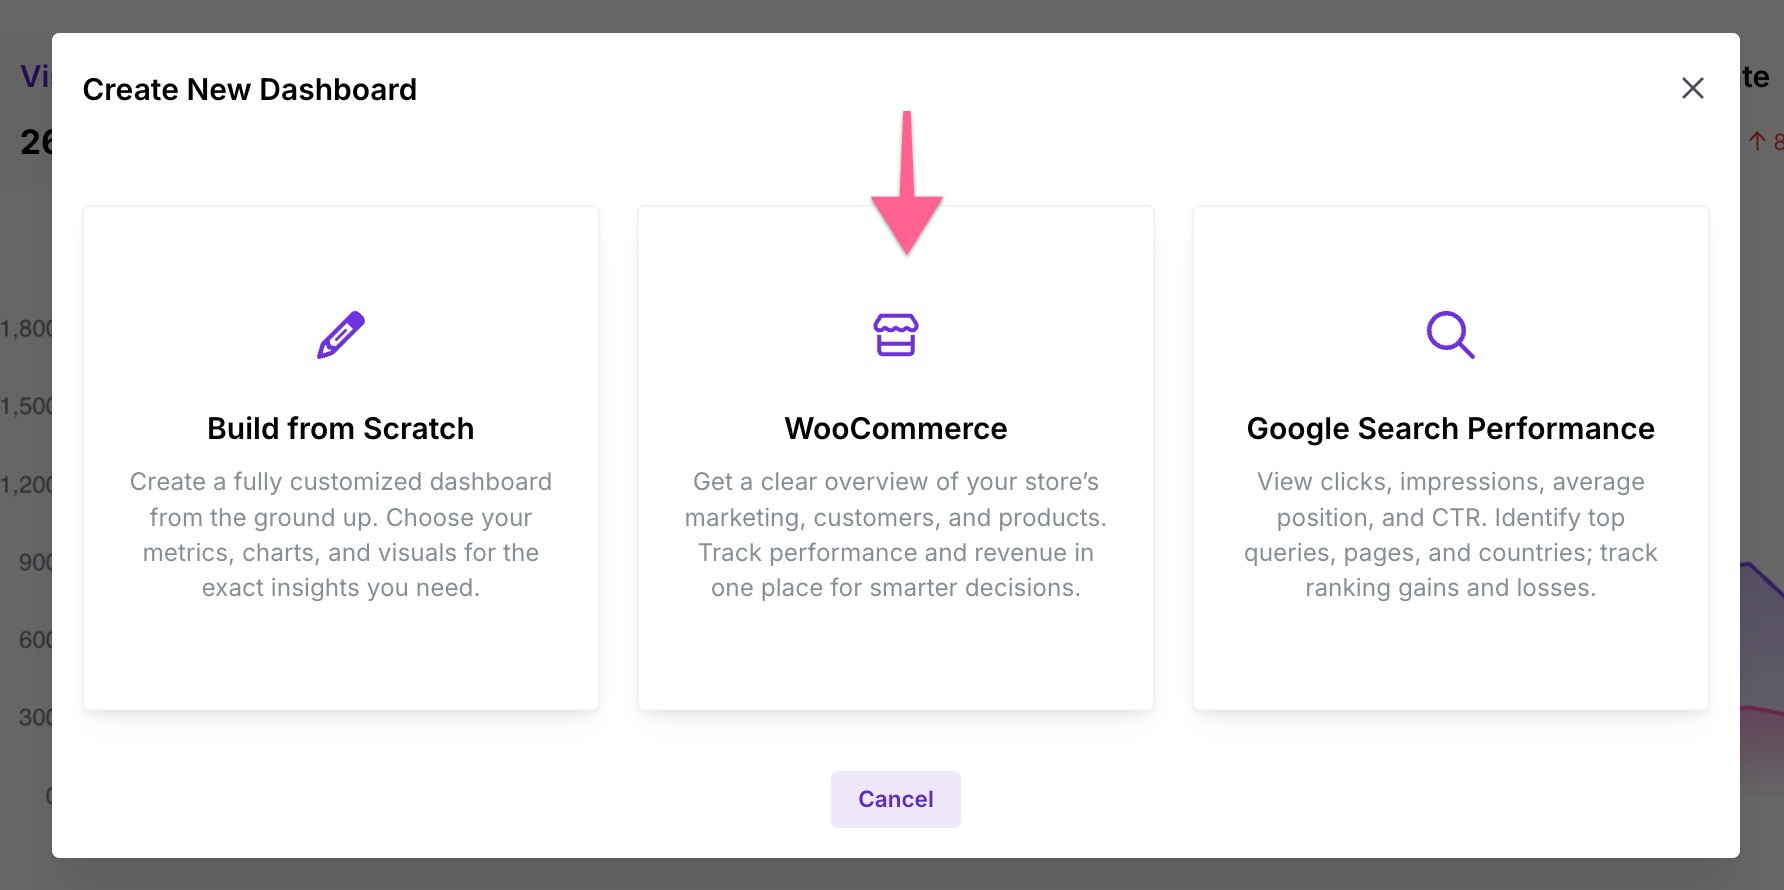
This will add a set of dashboards tailored for e-commerce analytics.
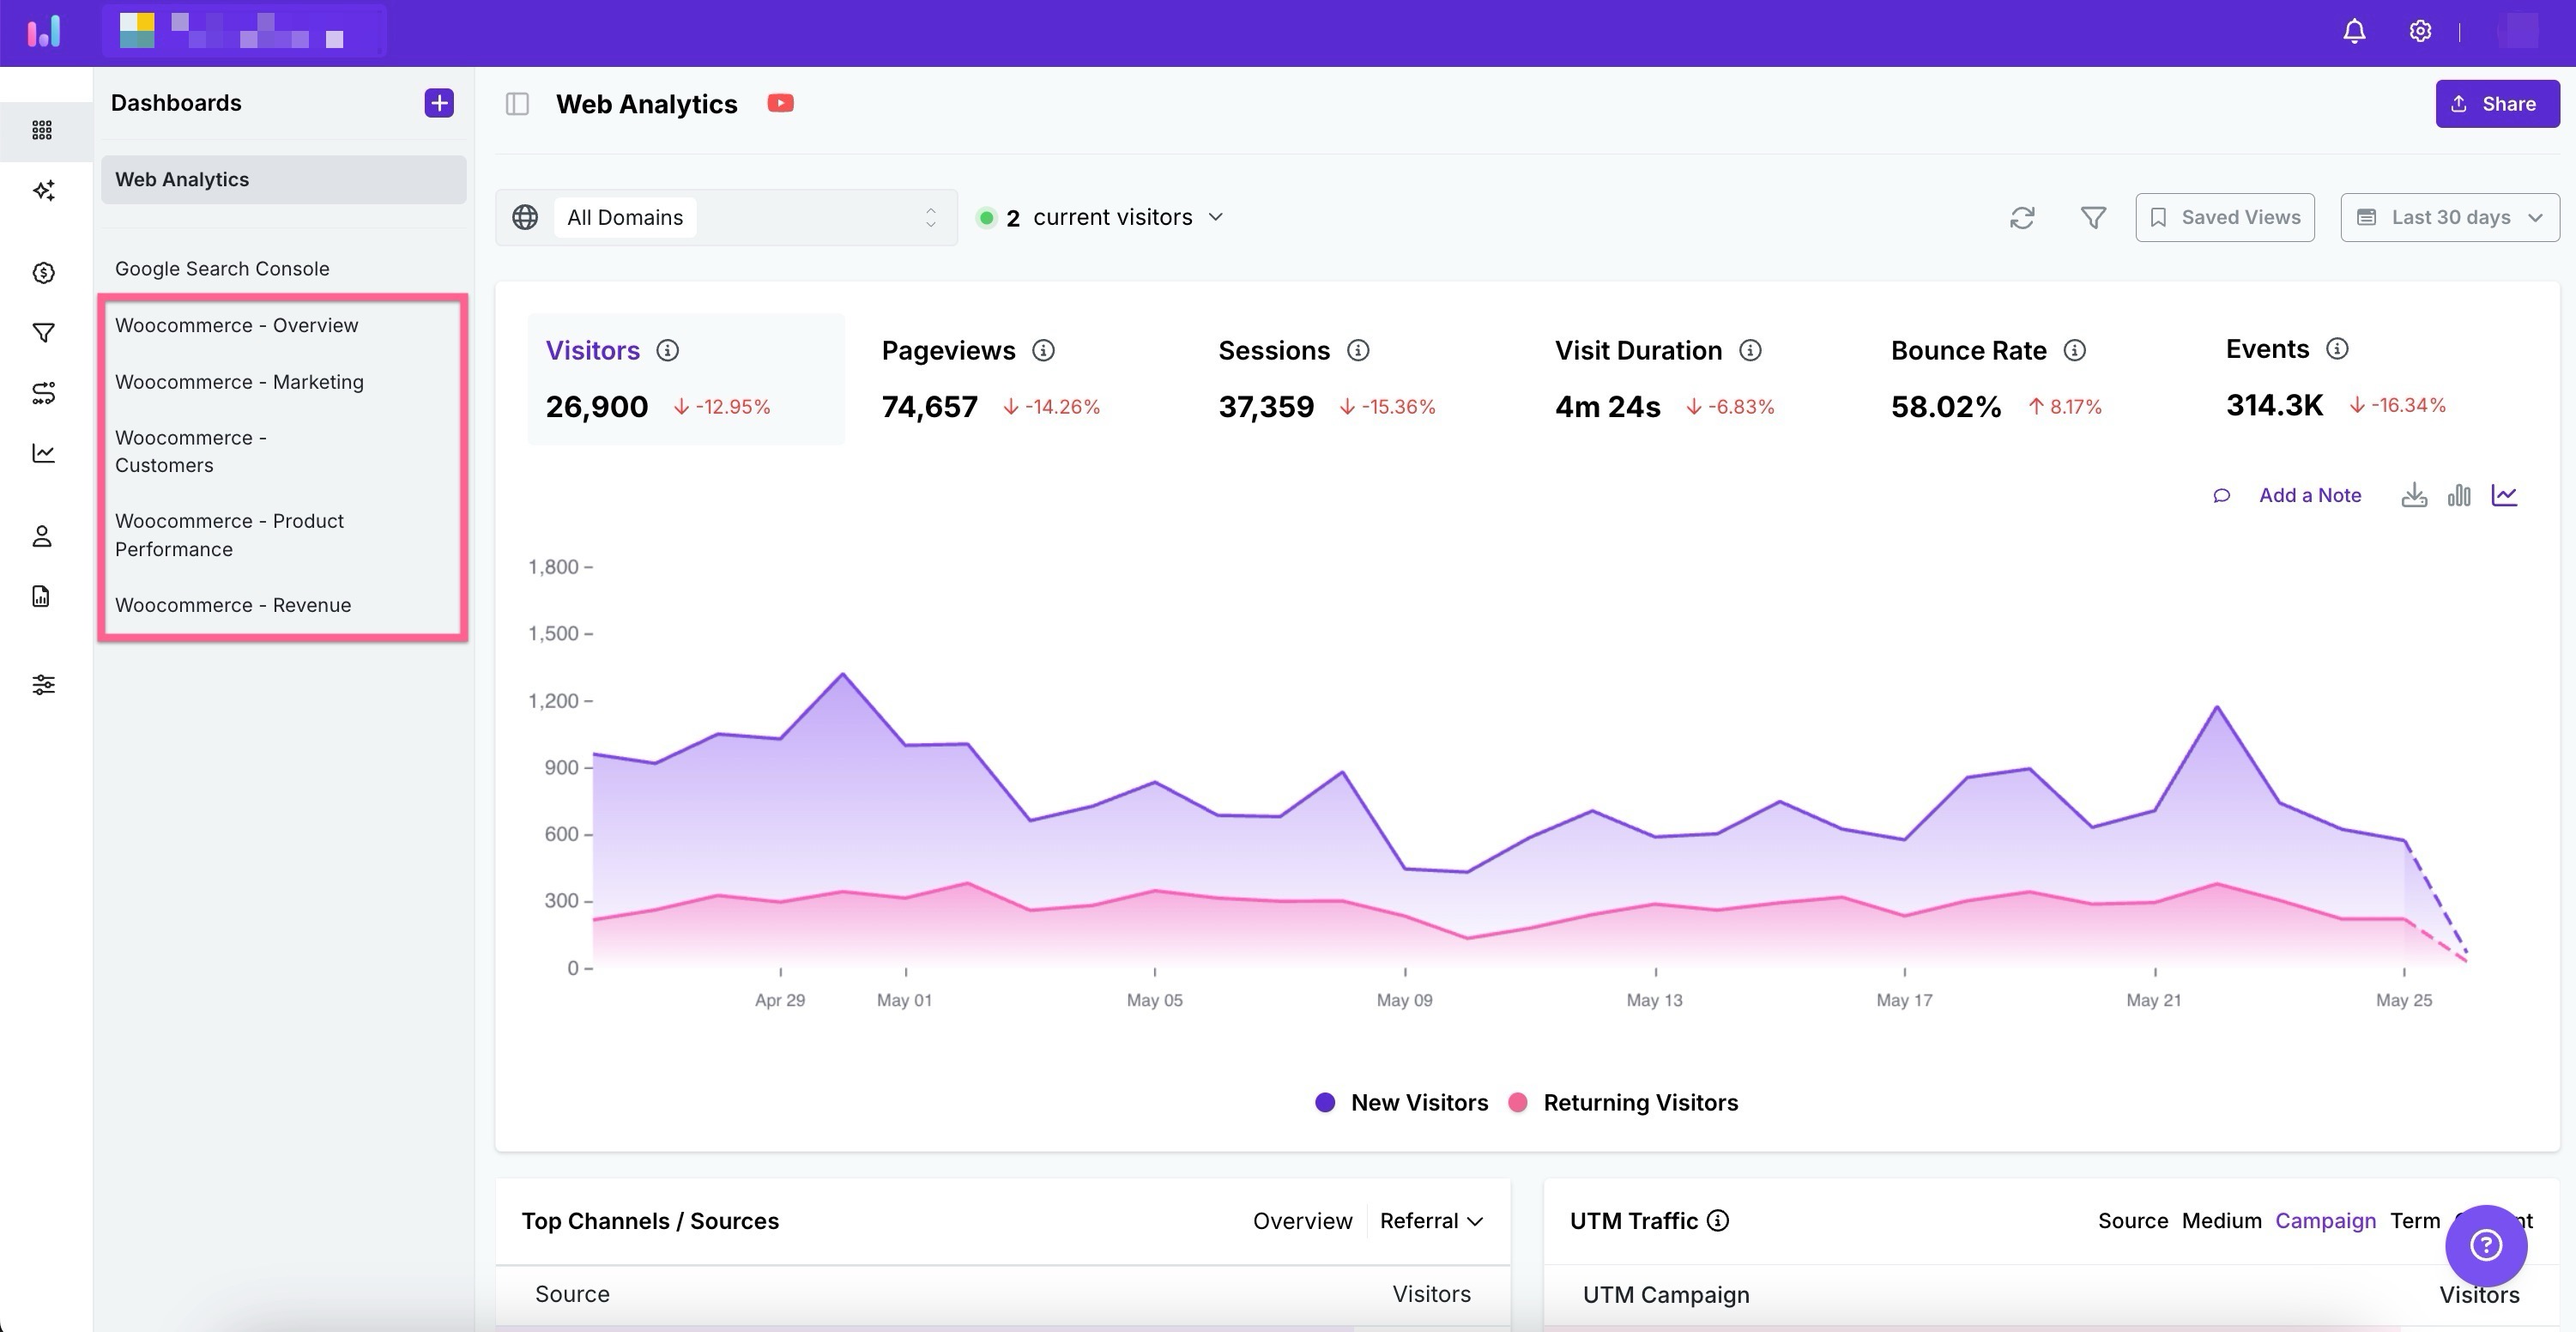
Available WooCommerce dashboards:
WooCommerce - Overview: A high-level summary of your store's performance.
WooCommerce - Marketing: Insights into marketing campaign effectiveness and traffic sources.
WooCommerce - Customers: Understanding customer behavior and segmentation.
WooCommerce - Product Performance: Analytics on how individual products are performing.
WooCommerce - Revenue: Detailed revenue metrics and trends.
Step 5: Leverage conversion goals
Tracking conversions is vital for understanding your store's success.
Automatic "Order received" conversion goal:
When you create the pre-built WooCommerce dashboards, an "Order received" conversion goal is automatically created in your Usermaven workspace.
This goal primarily utilizes the
order_in_processingcustom event to track successful orders.
Managing and creating more conversion goals:
You can find and manage your conversion goals in Usermaven by navigating to Configure > Conversion Goals.
It's highly recommended to create additional conversion goals to track other key actions in the customer journey, such as:
'Add to cart' (using the
added_to_cartevent)'Begin checkout' (using the
initiated_checkoutevent)'Order submitted' (using the
order_submittedevent)
Using conversion goals for attribution:
These defined conversion goals (both automatic and custom) are powerful tools for analysis.
You can use them with Usermaven's attribution features to understand:
Channel/Source Attribution: Identify which marketing channels and sources are driving conversions.
Paid Ads Attribution: Analyze the performance of your paid advertising campaigns in generating valuable actions.
These goals will also enhance the data presented in your default web analytics dashboard.
WooCommerce Order Flow & Usermaven Events
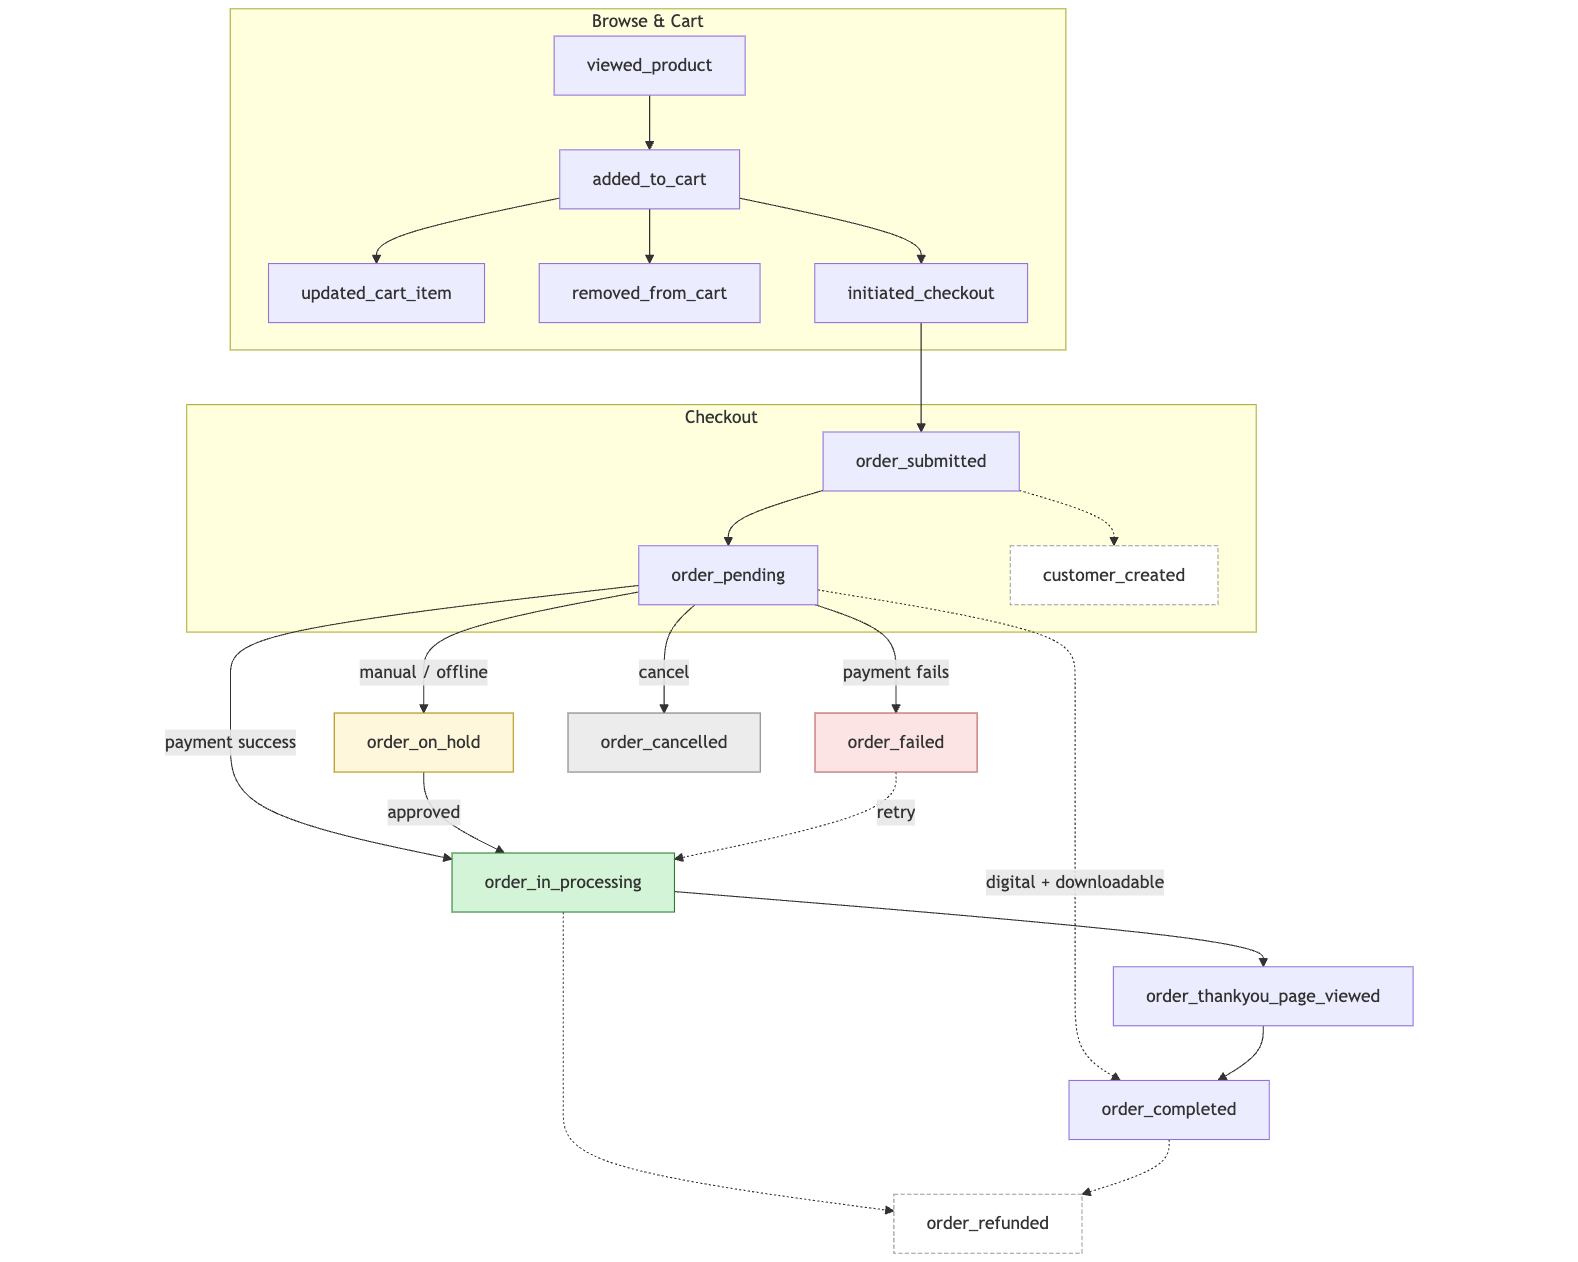
Understanding the WooCommerce order lifecycle is key to interpreting your Usermaven analytics. Different order stages in WooCommerce trigger specific Usermaven events, helping you track conversions and customer behavior.
The flow diagram below illustrates an order's entire journey: from product view and cart actions to checkout and post-submission outcomes. You'll see:
Typical Path: Most orders move from
Pending PaymenttoProcessing(triggeringorder_in_processing), then to theThank Youpage (order_thankyou_page_viewed), and finallyCompleted(order_completed).Other Scenarios: The diagram also covers payment failures (
order_failed), manual approvals (viaOn-Holdstatus), cancellations (order_cancelled), and refunds (order_refunded).
This visual flow diagram helps clarify when each event is triggered. For detailed definitions of WooCommerce's internal order statuses, please refer to the official WooCommerce Order Statuses documentation.
Troubleshooting & important notes
Widgets not working? Check
order_in_processing: If you find that some widgets in your WooCommerce dashboards are not populating with data, first ensure that the custom eventorder_in_processingis present and actively tracking events in your Usermaven workspace (Events & Goals > Custom events). This event is often crucial for revenue and order-related widgets, as well as the default "Order received" conversion goal.Using different custom events for widgets/goals: If you prefer to track a specific metric or goal using a different custom event name, you can edit the individual widgets within your Usermaven dashboards or modify the events used in your conversion goal definitions.
Allow time for data collection: After setup, allow some time for user activity to occur on your site for data to start populating in Usermaven.
Bypass ad-blockers (pixel white-labeling): The Usermaven WordPress plugin settings offer an option for "Custom Domain" to set up pixel white-labeling. This can help bypass ad-blockers for more accurate tracking. Refer to Usermaven documentation for more details on setting this up.
Embed stats in WP dashboard: The plugin settings also provide an option to "Enable your stats in your WordPress dashboard" by pasting a shared link from your Usermaven workspace. This allows you to see a snapshot of your Usermaven analytics directly within WordPress.
By following these steps, you’ll have a robust WooCommerce analytics and attribution setup with Usermaven, empowering you to make informed decisions and grow your online store. If you encounter any issues, contact our support team via email or in-app live chat.
Was this article helpful?