Shopify
In this guide, you will learn how to add the Usermaven tracking pixel to your Shopify store.
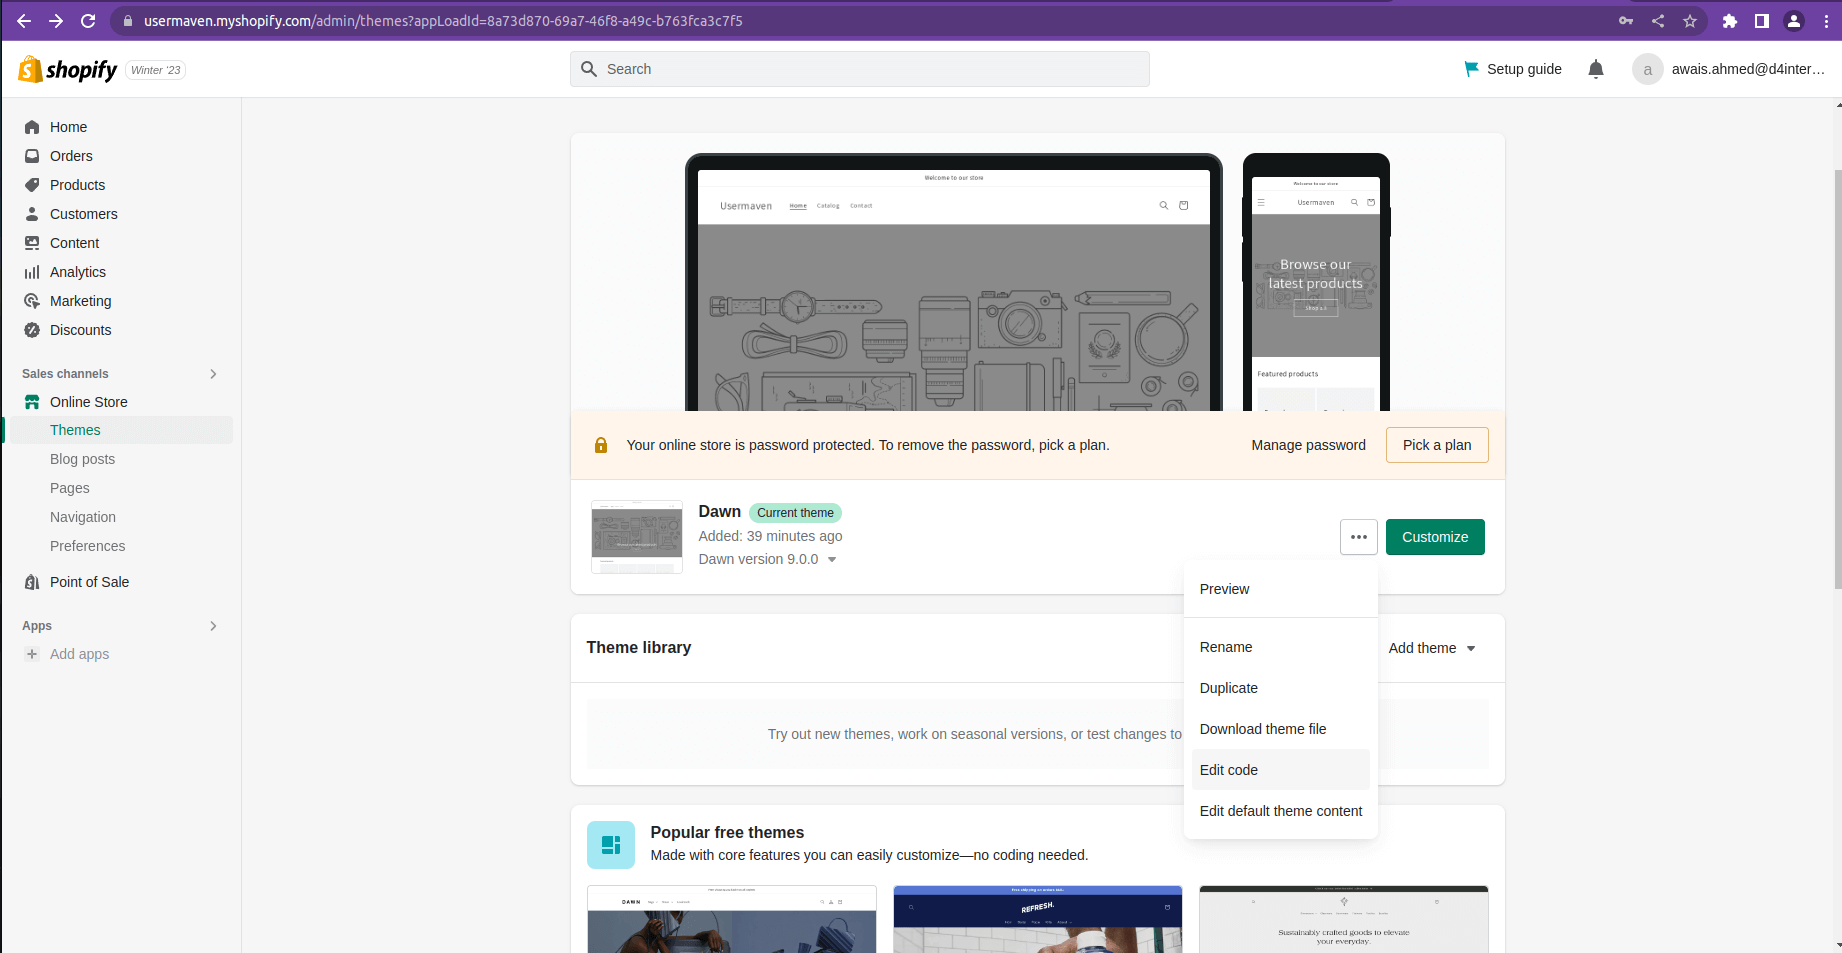
Log in to your Shopify dashboard and click on Sales Channels > Online Store > Themes in the left-hand side menu.
Click on the hamburger menu icon next to your current theme, and select "Edit code" from the drop-down menu.
You should now see a code editor. Click on theme.liquid under 'Layout' in the left sidebar, as shown in the image below:
Navigate until you find the closing head tag. Paste your snippet just before that tag, as shown in the image below:
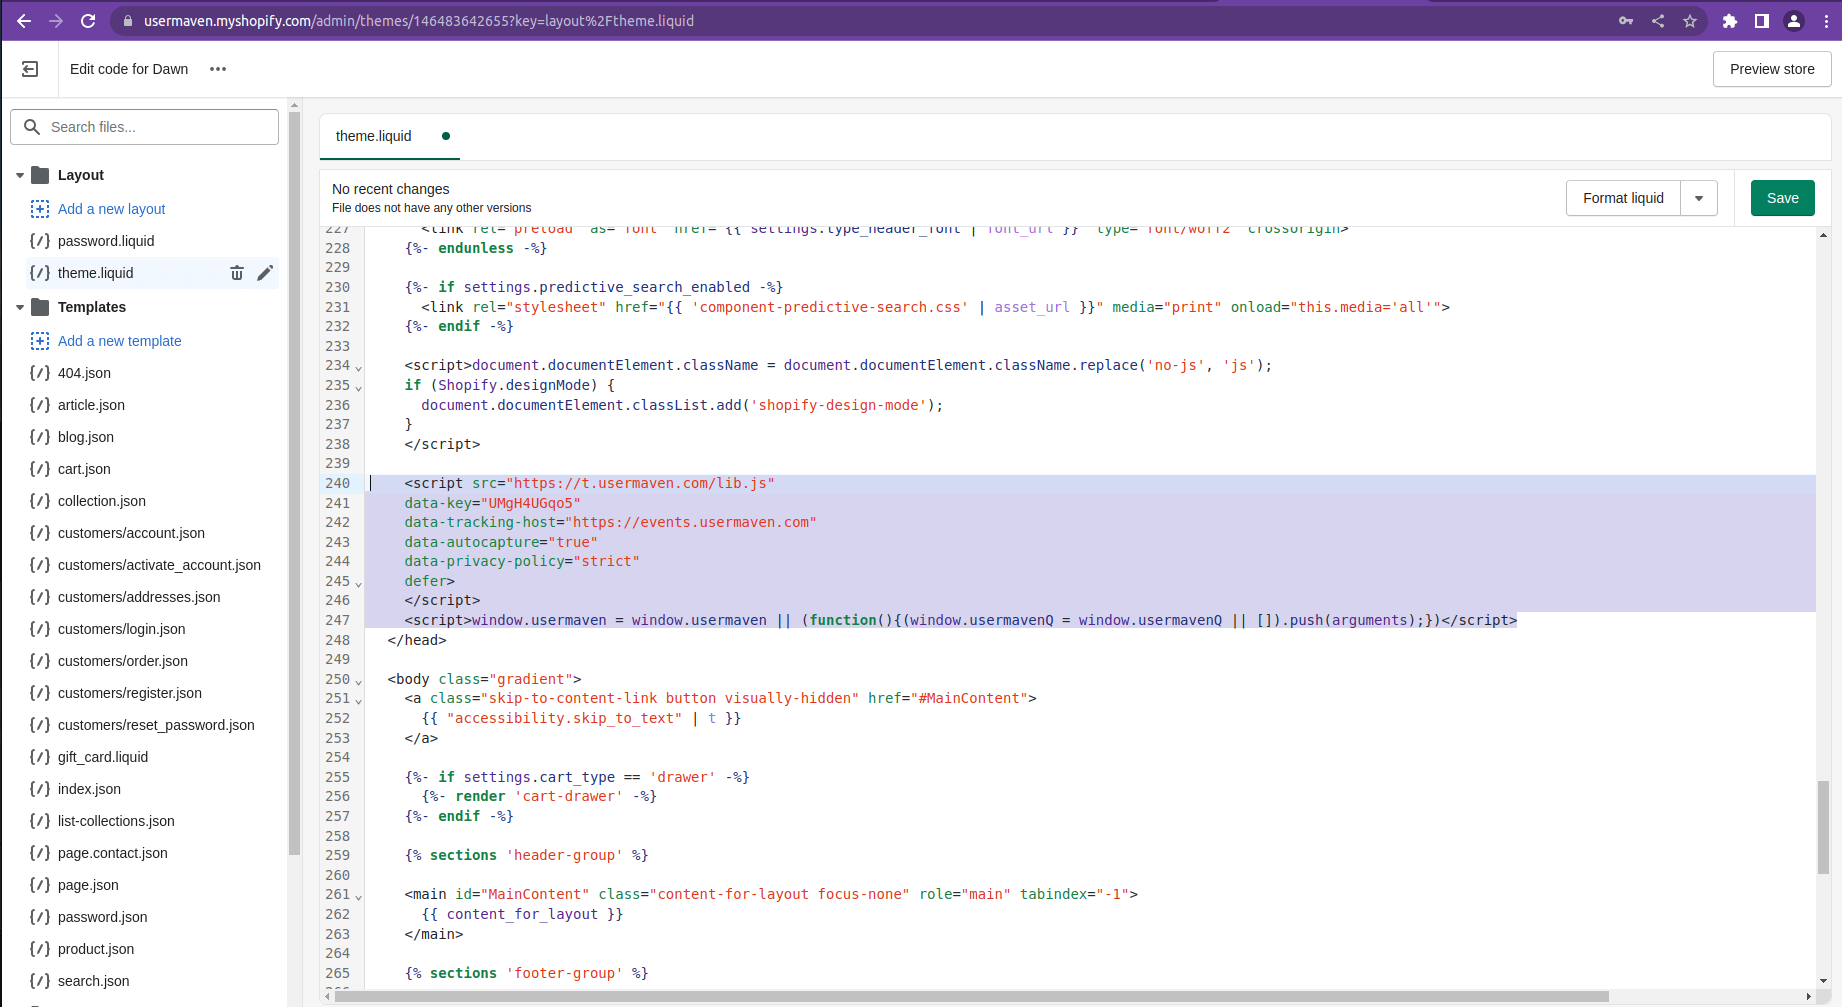
Your Usermaven tracking script code should resemble the following:
<script type="text/javascript">
    (function () {
        window.usermaven = window.usermaven || (function () { (window.usermavenQ = window.usermavenQ || []).push(arguments); })
        var t = document.createElement('script'),
            s = document.getElementsByTagName('script')[0];
        t.defer = true;
        t.id = 'um-tracker';
        t.setAttribute('data-tracking-host', "https://um.contentstudio.io")
        t.setAttribute('data-key', 'YOUR_API_KEY');
        t.setAttribute('data-autocapture', 'true');
        t.setAttribute('data-randomize-url','true');
        t.src = 'https://um.contentstudio.io/lib.js';
        s.parentNode.insertBefore(t, s);
    })();
  </script>
To access your exact tracking snippet code, follow these steps:
Log in to your Usermaven account.
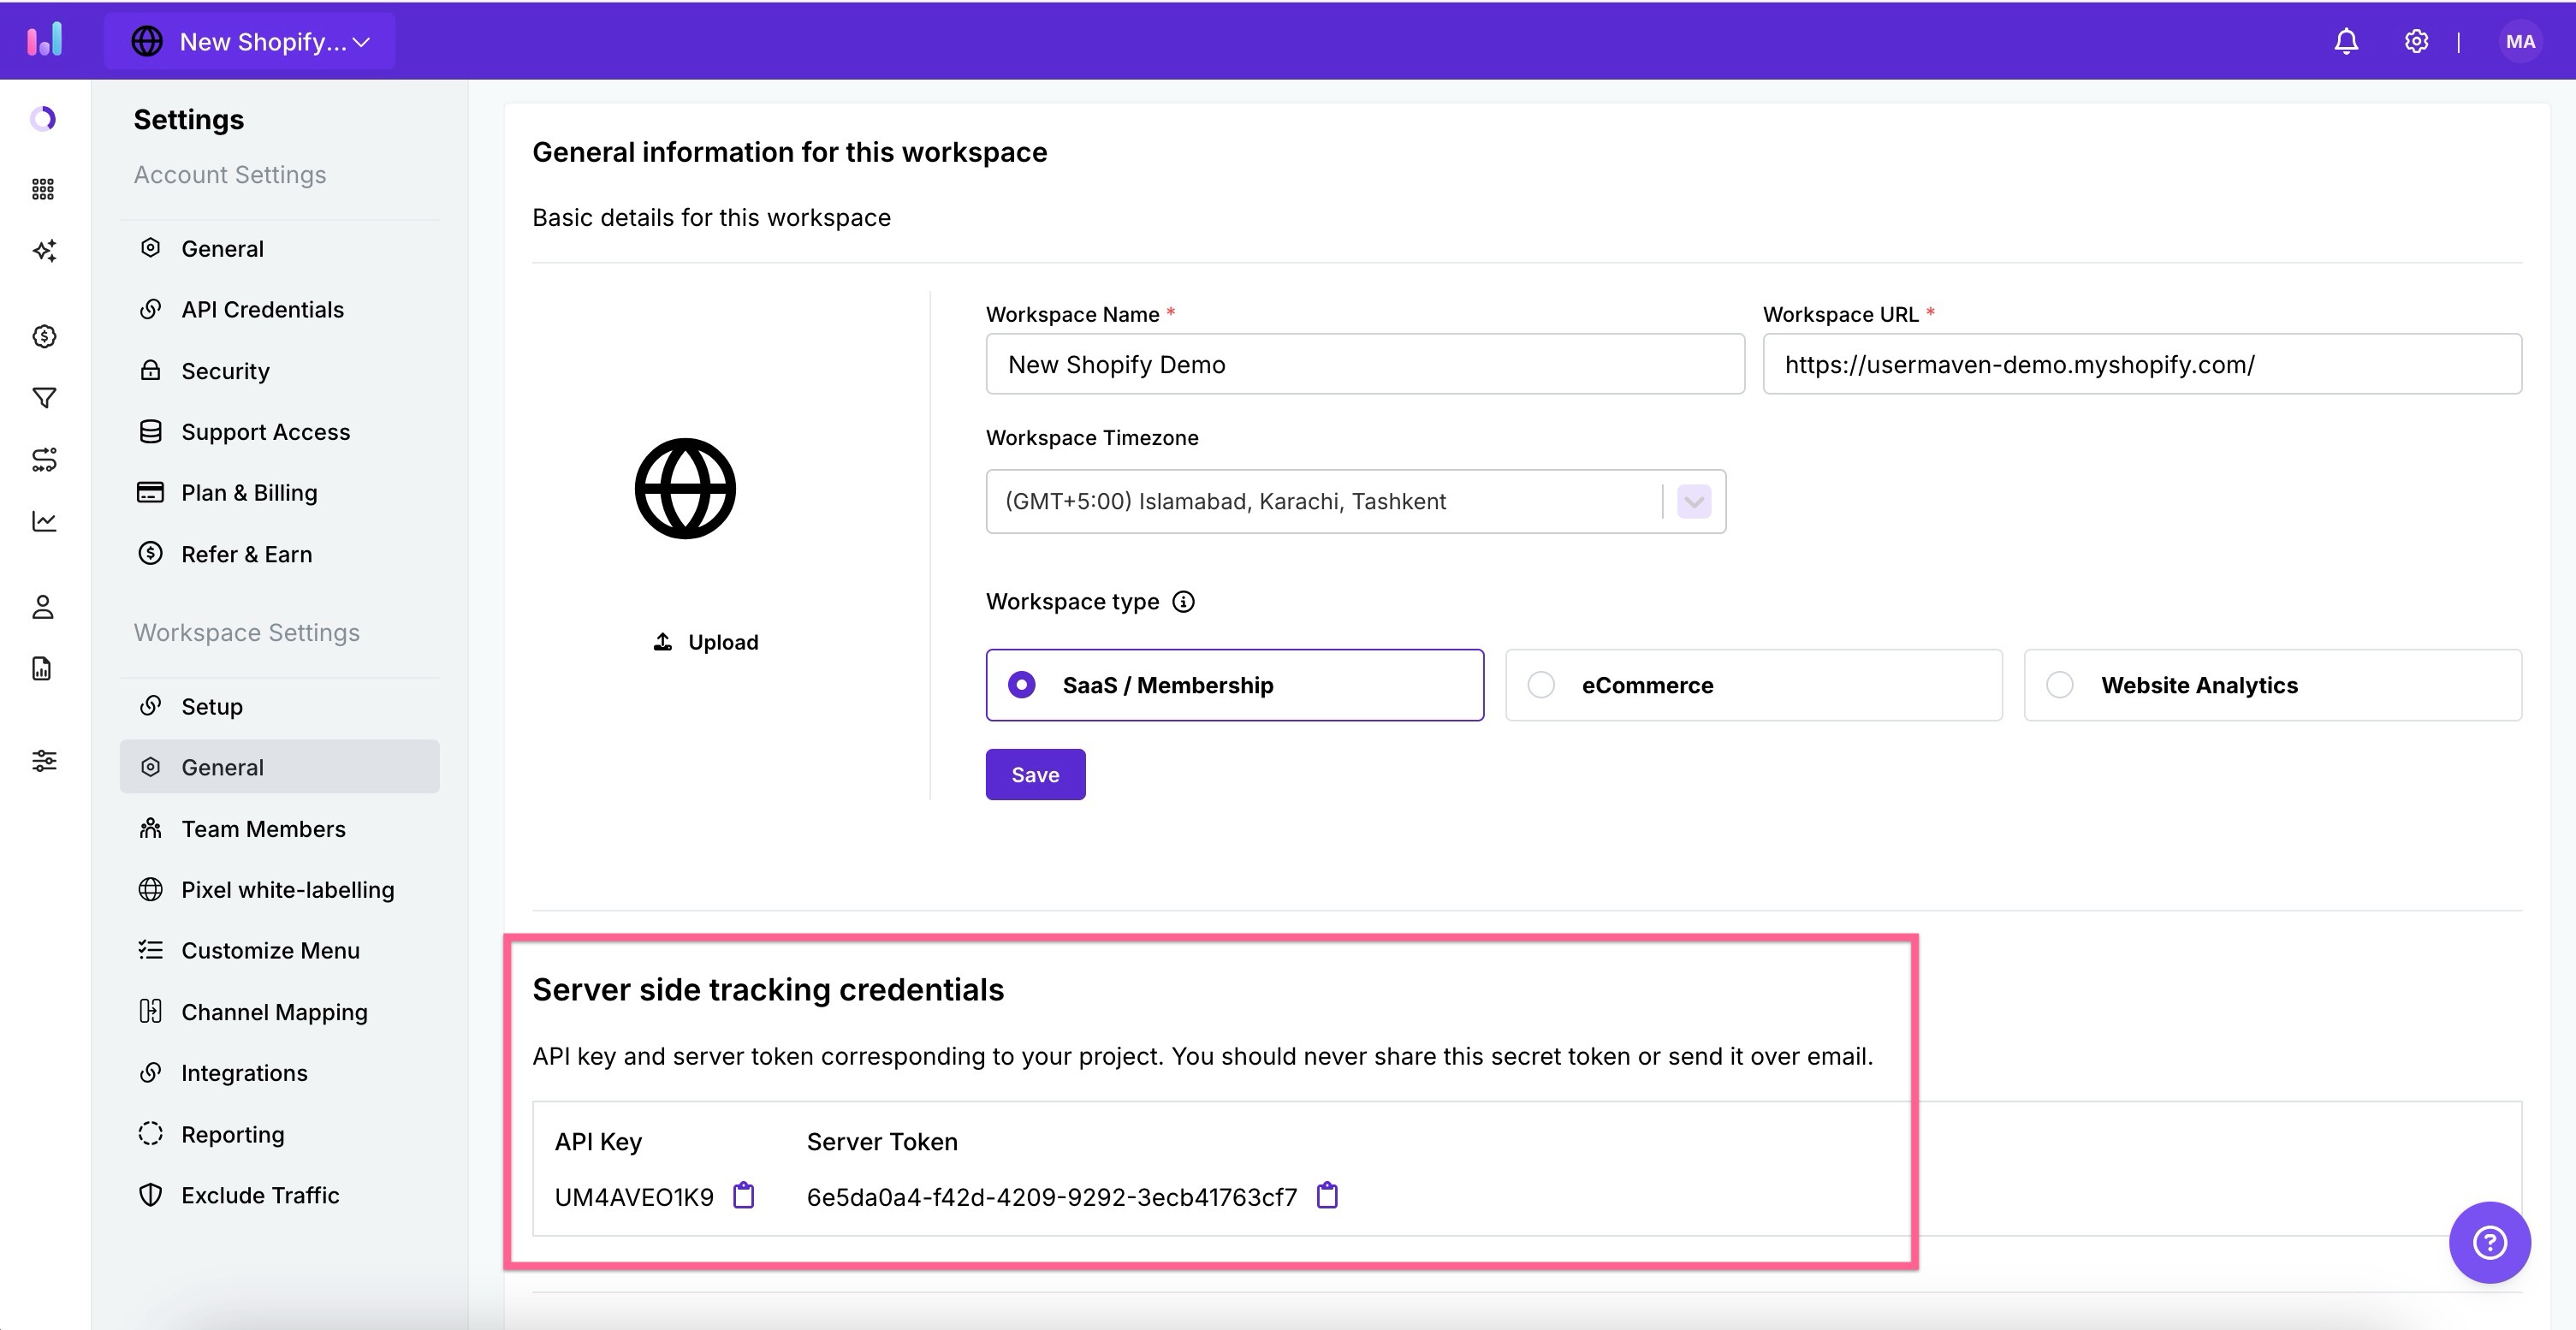
Navigate to the Workspace Setup section.
Locate the JavaScript snippet in the Add Tracking Pixel section. Copy it and paste it into Shopify as explained above.
Click on the "Save" button.
That's it! Now, your Shopify store will begin sending important data to your Usermaven workspace. To verify, you can go to your Usermaven account and check if the stats are being tracked.
Track checkouts and revenue attribution
Pre-requisite: You need to have the Usermaven workspace API key and Server Token to proceed with this step. You can find these details in the Workspace Setup section of your Usermaven account.
To start tracking Shopify customer events (such as "product_added_to_cart", "checkout_completed", and more) with Usermaven, follow these simple steps:
Log in to your Shopify admin account.
At the bottom left, click on Settings.
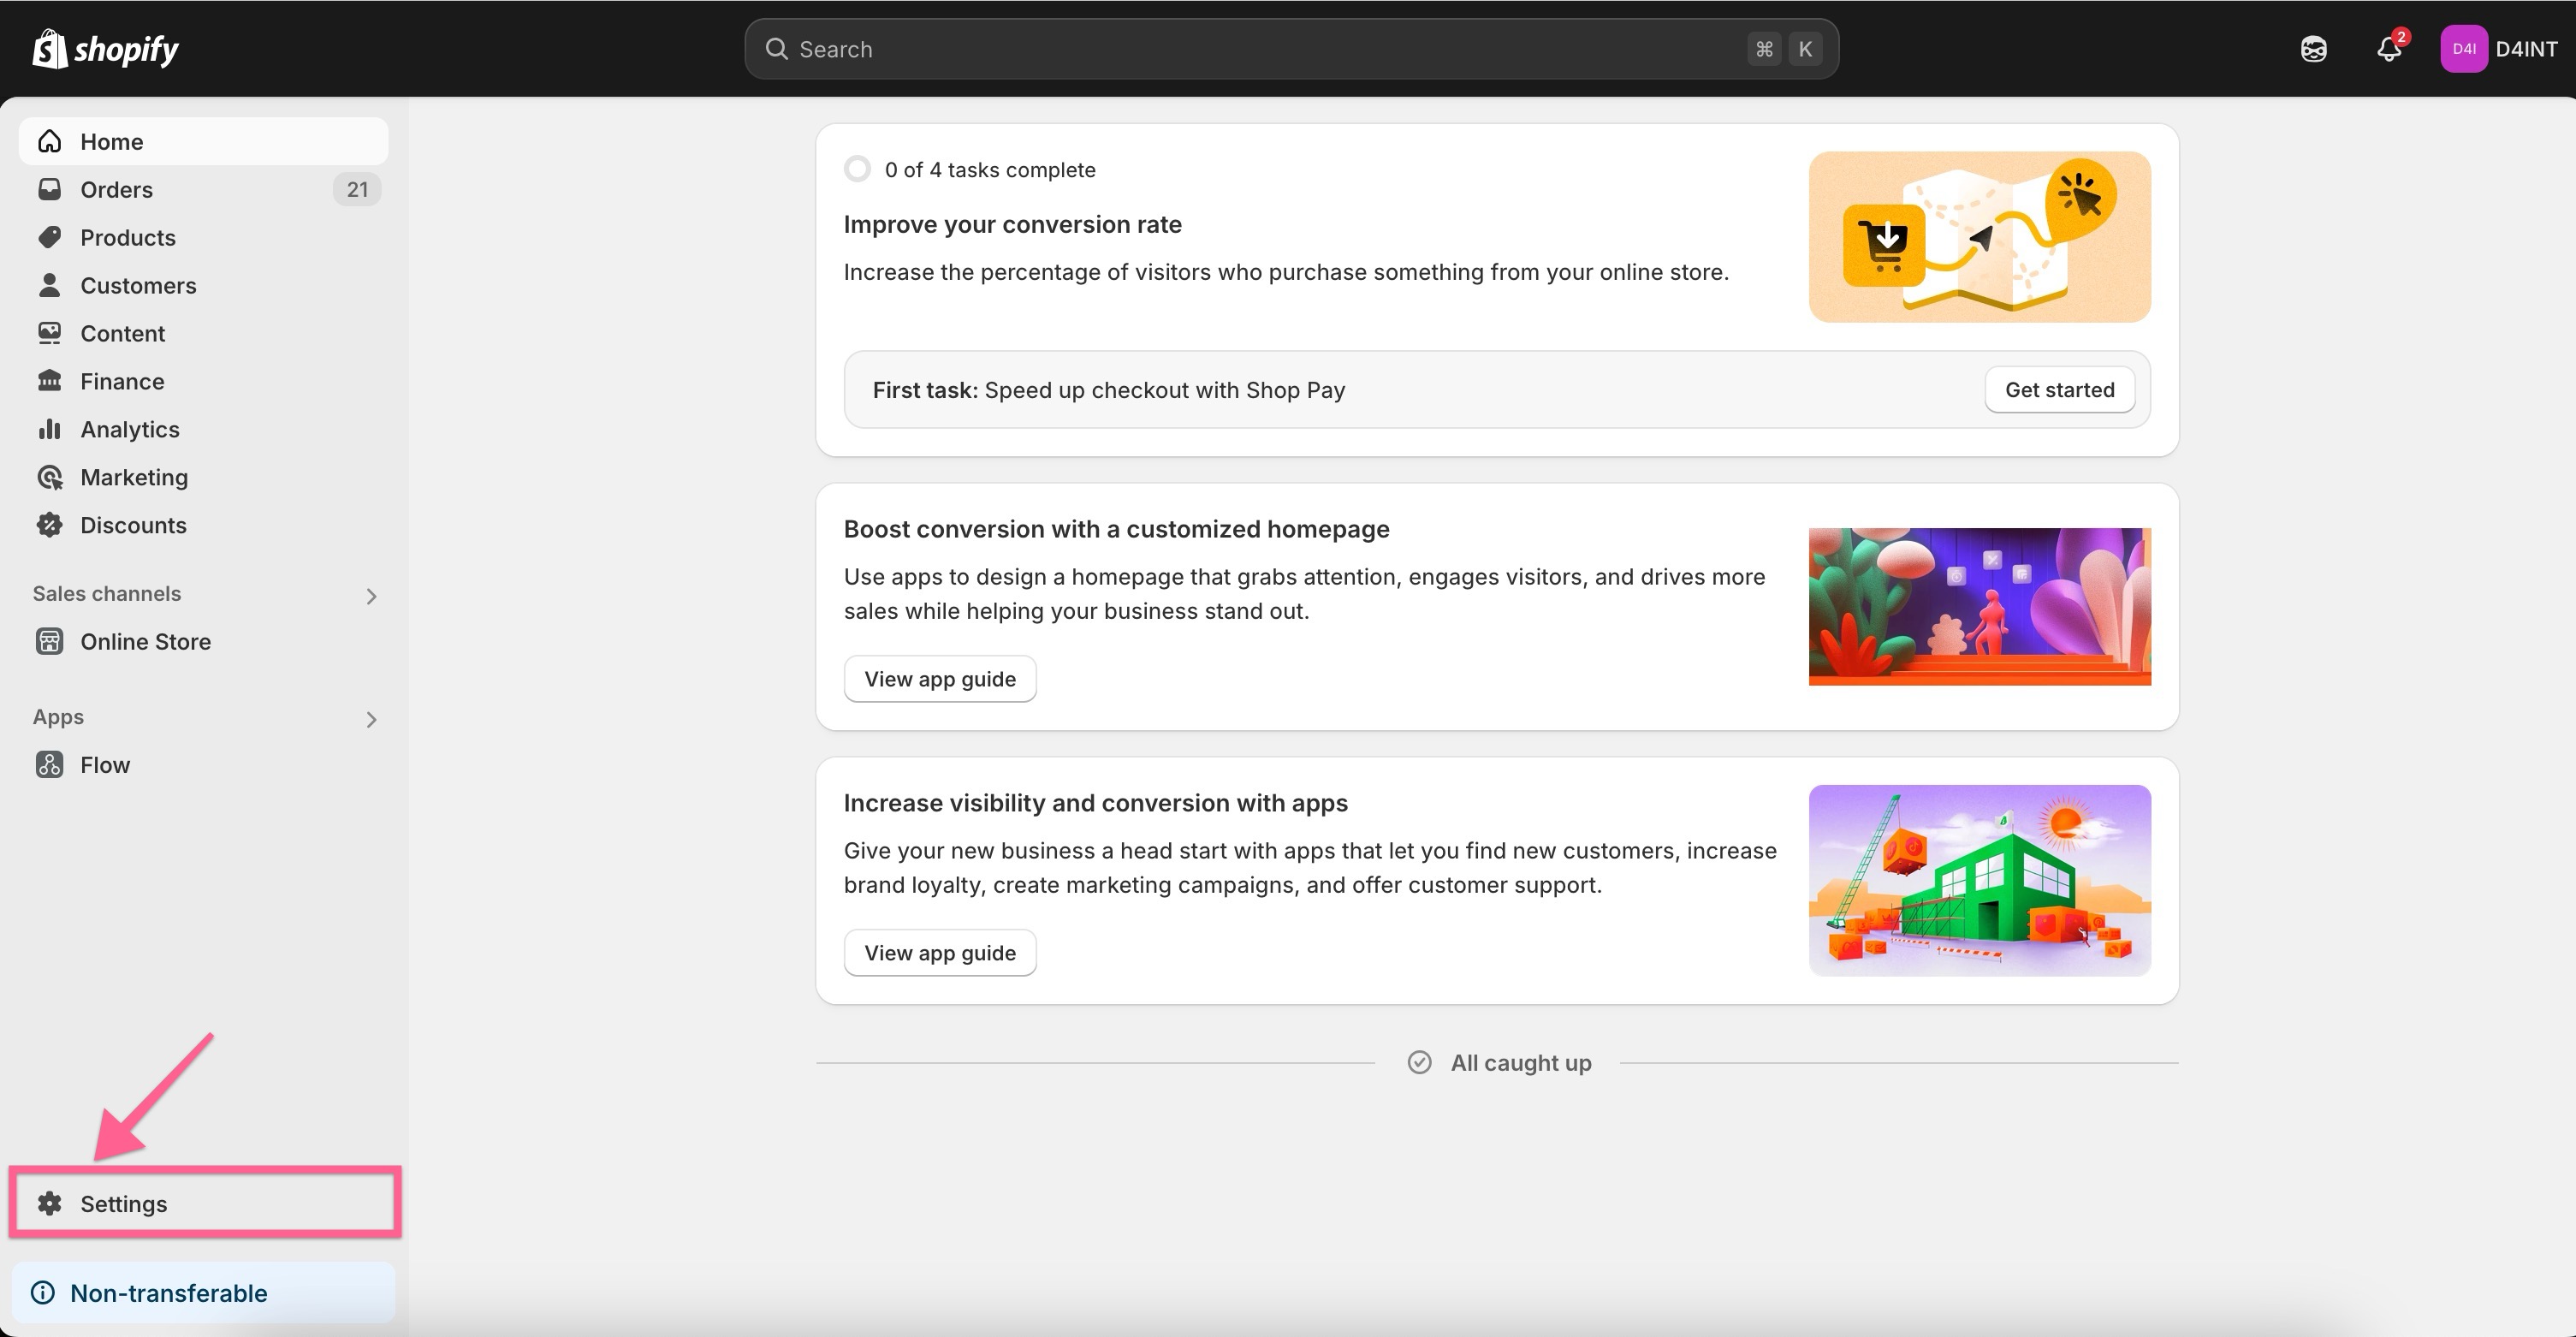
Navigate to the Customer events section.
Click on Add custom pixel.
Enter a name for your pixel (e.g., "Product added to cart").
Copy and paste the Usermaven tracking snippet provided in your Usermaven account into the Code block.
(Make sure to include event-specific tracking codes based on the events you wish to track.) 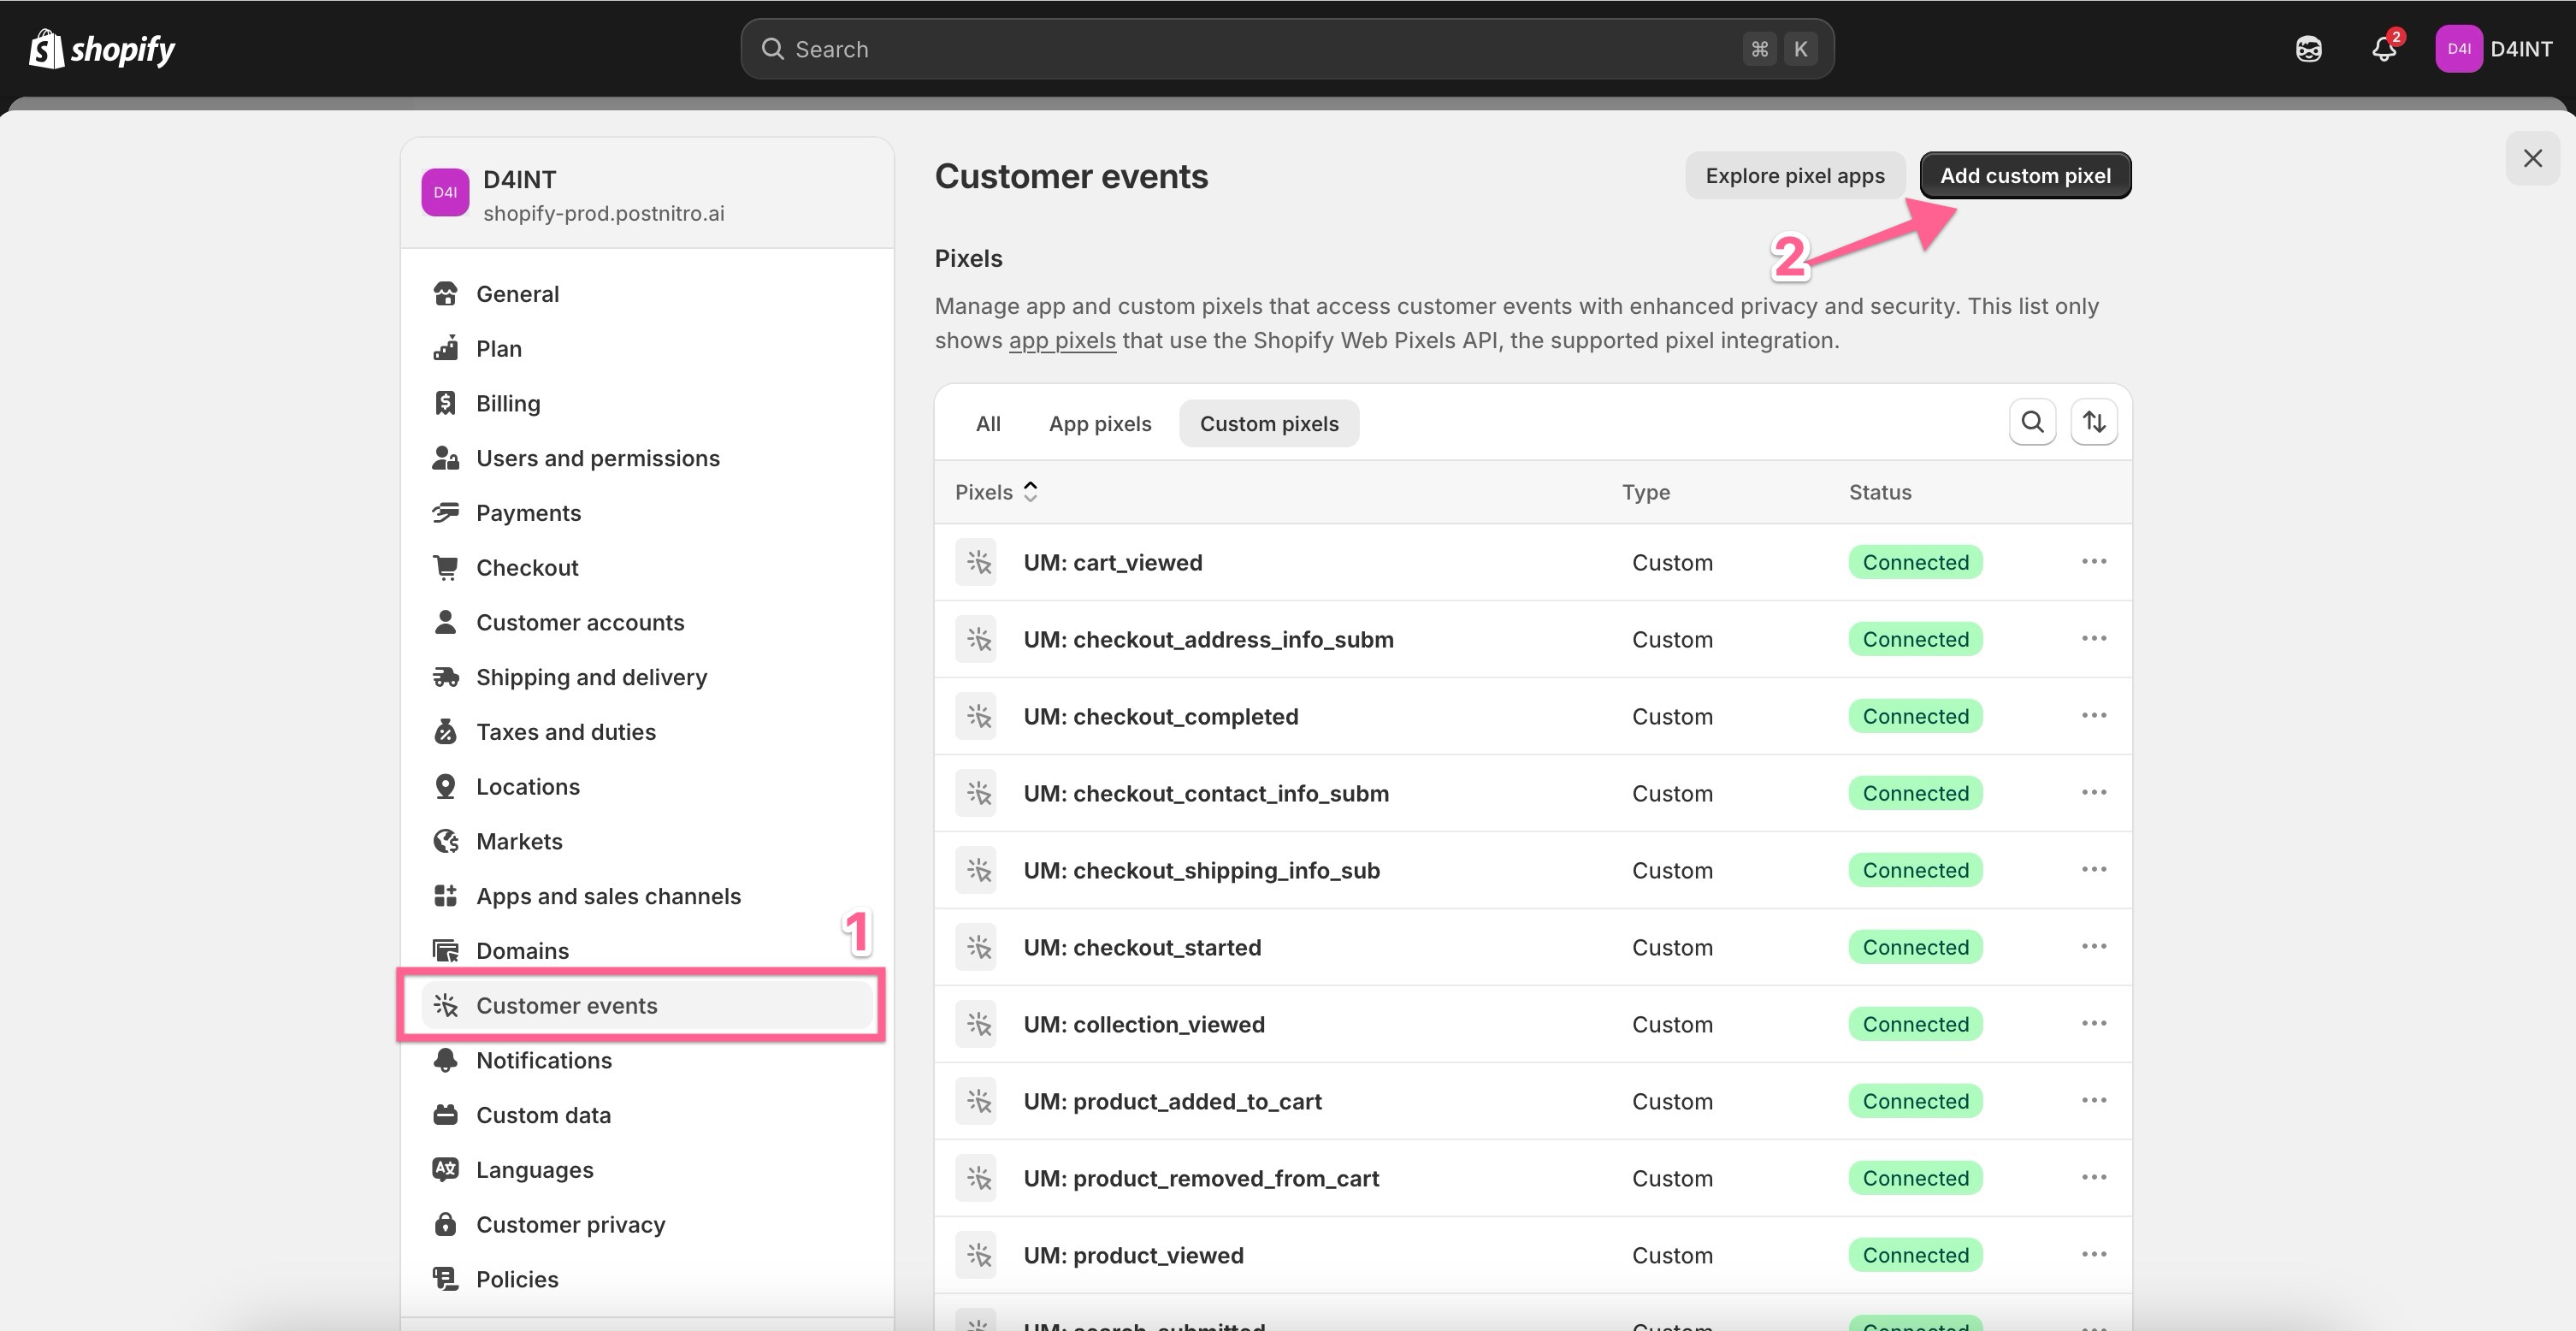Click Save at the top and then connect the pixel.
Track product viewed
Send a custom event called "Product Viewed" to Usermaven every time a customer views a product. Product details such as name, price, and ID will be recorded under this event.
const API_KEY = 'API_KEY'; // Replace with your API key
const SERVER_TOKEN = 'SERVER_TOKEN'; // Replace with your SERVER TOKEN

// Utility function to read a cookie by name
function getCookie(name) {
  const value = `; ${document.cookie}`;
  const parts = value.split(`; ${name}=`);
  if (parts.length === 2) return parts.pop().split(';').shift();
  return '';
}

// Safely extracts product data from an event object
const extractProductData = (event) => {
  // Initialize an empty item object with default values
  let item = {
    // Product Information
    name: '',
    price: 0,
    currency: '',
    id: '',
    variation_id: '',

    // Additional Product Details
    vendor: '',
    url: '',
    type: '',
    sku: '',
  };

  // Only try to extract data if event and productVariant exist
  if (event) {
    // Product Information

    if (event.productVariant && event.productVariant.product) {
      item.name = event.productVariant.product.title || '';
      item.id = event.productVariant.product.id || '';
      item.vendor = event.productVariant.product.vendor || '';
      item.url = event.productVariant.product.url || '';
      item.type = event.productVariant.product.type || '';
    }

    // Price information
    if (event.productVariant && event.productVariant.price) {
      item.price = event.productVariant.price.amount || 0;
      item.currency = event.productVariant.price.currencyCode || '';
    }

    // Variant information
    if (event.productVariant) {
      item.variation_id = event.productVariant.id || '';
      item.sku = event.productVariant.sku || '';
    }
  }
  return item;
};

// Regexs for the urls
const regexForUrl = /wpm@[a-zA-Z0-9]+\/custom\/web-pixel-\d+@\d+\/sandbox\/modern\//;
const regexForDocPath = /\/wpm@[a-zA-Z0-9]+\/custom\/web-pixel-\d+@\d+\/sandbox\/modern/;

analytics.subscribe('product_viewed', (event) => {
  // Extract event details from the correct location in the event object
  const item = extractProductData(event.data);

  // Retrieve anonymous_id from the cookie
  const anonymousId = getCookie('__eventn_id_' + API_KEY) || 'default_anonymous_id';

  console.log(event);

  // Get context from the event object
  const context = event.context || {};
  const documentContext = context.document || {};
  const windowContext = context.window || {};
  const navigatorContext = context.navigator || {};
  const screenContext = windowContext.screen || {};

  // Build the payload following Usermaven API requirements
  const payload = {
    api_key: API_KEY, // Replace with your API key
    event_id: '', // Optionally assign an event ID if needed
    event_type: 'product_viewed', // Custom event type
    timestamp: Date.now(), // Current timestamp in milliseconds (UTC)
    event_attributes: {
      ...item,
      items: [item],
    },
    ids: {},
    user: {
      // Use the cookie value for anonymous_id
      anonymous_id: anonymousId,
      id: event.data.user ? event.data.user.id : '',
      email: event.data.user ? event.data.user.email : '',
      created_at: event.data.user ? event.data.user.created_at : new Date().toISOString(),
      first_name: event.data.user ? event.data.user.first_name : '',
      last_name: event.data.user ? event.data.user.last_name : '',
      custom: event.data.user ? event.data.user.custom : {},
    },
    // Optional: include company-level attributes if available
    // company: { ... },
    screen_resolution:
      screenContext.width && screenContext.height ? `${screenContext.width}x${screenContext.height}` : '0',
    src: 'http',
    url: documentContext.location ? documentContext.location.href.replace(regexForUrl, '') : '',
    page_title: documentContext.title || '',
    doc_path: documentContext.location
      ? documentContext.location.pathname.replace(regexForDocPath, '') +
        (documentContext.location.search ? documentContext.location.search : '')
      : '',
    doc_host: documentContext.location ? documentContext.location.hostname : '',
    doc_search: documentContext.location ? documentContext.location.search : '',
    vp_size:
      windowContext.innerWidth && windowContext.innerHeight
        ? `${windowContext.innerWidth}x${windowContext.innerHeight}`
        : '0',
    user_agent: navigatorContext.userAgent || '',
    user_language: navigatorContext.language || '',
    doc_encoding: documentContext.characterSet || 'UTF-8',
  };

  // Send the event to the Usermaven endpoint
  fetch('https://events.usermaven.com/api/v1/s2s/event?token=' + API_KEY + '.' + SERVER_TOKEN, {
    method: 'POST',
    headers: {
      'Content-Type': 'application/json',
    },
    body: JSON.stringify(payload),
    keepalive: true,
  })
    .then((response) => response.json())
    .then((data) => console.log('Usermaven event sent successfully:', data))
    .catch((error) => console.error('Error sending event to Usermaven:', error));
});
Track product added to cart
Send a custom event called "Product Added to Cart" to Usermaven each time a product is added to the shopping cart. This event will record product details including name, price, quantity, and ID.
const API_KEY = 'API_KEY'; // Replace with your API key
const SERVER_TOKEN = 'SERVER_TOKEN'; // Replace with your SERVER TOKEN

// Utility function to read a cookie by name
function getCookie(name) {
  const value = `; ${document.cookie}`;
  const parts = value.split(`; ${name}=`);
  if (parts.length === 2) return parts.pop().split(';').shift();
  return '';
}
// Regexs for the urls
const regexForUrl = /wpm@[a-zA-Z0-9]+\/custom\/web-pixel-\d+@\d+\/sandbox\/modern\//;
const regexForDocPath = /\/wpm@[a-zA-Z0-9]+\/custom\/web-pixel-\d+@\d+\/sandbox\/modern/;

analytics.subscribe('product_added_to_cart', (event) => {
  // Extract product data from cart line
  const cartLine = event.data.cartLine || {};
  const merchandise = cartLine.merchandise || {};

  // Create a product item object
  const item = {
    // Product Information
    name: merchandise.product ? merchandise.product.title || merchandise.title || '' : '',
    price: cartLine.cost && cartLine.cost.totalAmount ? cartLine.cost.totalAmount.amount || 0 : 0,
    currency: cartLine.cost && cartLine.cost.totalAmount ? cartLine.cost.totalAmount.currencyCode || '' : '',
    id: merchandise.product ? merchandise.product.id || '' : '',
    variation_id: merchandise.id || '',

    // Additional Product Details
    vendor: merchandise.product ? merchandise.product.vendor || '' : '',
    url: merchandise.product ? merchandise.product.url || '' : '',
    type: merchandise.product ? merchandise.product.type || '' : '',
    sku: merchandise.sku || '',

    // Cart-specific information
    quantity: cartLine.quantity || 1,
    variant_title: merchandise.title || '',
    price_total: cartLine.cost && cartLine.cost.totalAmount ? cartLine.cost.totalAmount.amount || 0 : 0,
  };

  // Retrieve anonymous_id from the cookie
  const anonymousId = getCookie('__eventn_id_' + API_KEY) || 'default_anonymous_id';

  console.log(event);

  // Get context from the event object
  const context = event.context || {};
  const documentContext = context.document || {};
  const windowContext = context.window || {};
  const navigatorContext = context.navigator || {};
  const screenContext = windowContext.screen || {};

  // Build the payload following Usermaven API requirements
  const payload = {
    api_key: API_KEY,
    event_id: '',
    event_type: 'product_added_to_cart',
    timestamp: Date.now(),
    event_attributes: {
      ...item,
      items: [item],
    },
    ids: {},
    user: {
      anonymous_id: anonymousId,
      id: event.data.user ? event.data.user.id : '',
      email: event.data.user ? event.data.user.email : '',
      created_at: event.data.user ? event.data.user.created_at : new Date().toISOString(),
      first_name: event.data.user ? event.data.user.first_name : '',
      last_name: event.data.user ? event.data.user.last_name : '',
      custom: event.data.user ? event.data.user.custom : {},
    },
    screen_resolution:
      screenContext.width && screenContext.height ? `${screenContext.width}x${screenContext.height}` : '0',
    src: 'http',
    url: documentContext.location ? documentContext.location.href.replace(regexForUrl, '') : '',
    page_title: documentContext.title || '',
    doc_path: documentContext.location
      ? documentContext.location.pathname.replace(regexForDocPath, '') +
        (documentContext.location.search ? documentContext.location.search : '')
      : '',
    doc_host: documentContext.location ? documentContext.location.hostname : '',
    doc_search: documentContext.location ? documentContext.location.search : '',
    vp_size:
      windowContext.innerWidth && windowContext.innerHeight
        ? `${windowContext.innerWidth}x${windowContext.innerHeight}`
        : '0',
    user_agent: navigatorContext.userAgent || '',
    user_language: navigatorContext.language || '',
    doc_encoding: documentContext.characterSet || 'UTF-8',
  };

  // Send the event to the Usermaven endpoint
  fetch('https://events.usermaven.com/api/v1/s2s/event?token=' + API_KEY + '.' + SERVER_TOKEN, {
    method: 'POST',
    headers: {
      'Content-Type': 'application/json',
    },
    body: JSON.stringify(payload),
    keepalive: true,
  })
    .then((response) => response.json())
    .then((data) => console.log('Usermaven event sent successfully:', data))
    .catch((error) => console.error('Error sending event to Usermaven:', error));
});
Track product removed from cart
Send a custom event called "Product Removed from Cart" to Usermaven whenever a product is removed from the shopping cart. Product details such as name, price, quantity, and ID will be captured under this event.
const API_KEY = 'API_KEY'; // Replace with your API key
const SERVER_TOKEN = 'SERVER_TOKEN'; // Replace with your SERVER TOKEN

// Utility function to read a cookie by name
function getCookie(name) {
  const value = `; ${document.cookie}`;
  const parts = value.split(`; ${name}=`);
  if (parts.length === 2) return parts.pop().split(';').shift();
  return '';
}
// Regexs for the urls
const regexForUrl = /wpm@[a-zA-Z0-9]+\/custom\/web-pixel-\d+@\d+\/sandbox\/modern\//;
const regexForDocPath = /\/wpm@[a-zA-Z0-9]+\/custom\/web-pixel-\d+@\d+\/sandbox\/modern/;

analytics.subscribe('product_removed_from_cart', (event) => {
  // Extract product data from cart line
  const cartLine = event.data.cartLine || {};
  const merchandise = cartLine.merchandise || {};

  // Create a product item object
  const item = {
    // Product Information
    name: merchandise.product ? merchandise.product.title || merchandise.title || '' : '',
    price: cartLine.cost && cartLine.cost.totalAmount ? cartLine.cost.totalAmount.amount || 0 : 0,
    currency: cartLine.cost && cartLine.cost.totalAmount ? cartLine.cost.totalAmount.currencyCode || '' : '',
    id: merchandise.product ? merchandise.product.id || '' : '',
    variation_id: merchandise.id || '',

    // Additional Product Details
    vendor: merchandise.product ? merchandise.product.vendor || '' : '',
    url: merchandise.product ? merchandise.product.url || '' : '',
    type: merchandise.product ? merchandise.product.type || '' : '',
    sku: merchandise.sku || '',

    // Cart-specific information
    quantity: cartLine.quantity || 1,
    variant_title: merchandise.title || '',
    price_total: cartLine.cost && cartLine.cost.totalAmount ? cartLine.cost.totalAmount.amount || 0 : 0,
  };

  // Retrieve anonymous_id from the cookie
  const anonymousId = getCookie('__eventn_id_' + API_KEY) || 'default_anonymous_id';

  console.log(event);

  // Get context from the event object
  const context = event.context || {};
  const documentContext = context.document || {};
  const windowContext = context.window || {};
  const navigatorContext = context.navigator || {};
  const screenContext = windowContext.screen || {};

  // Build the payload following Usermaven API requirements
  const payload = {
    api_key: API_KEY,
    event_id: '',
    event_type: 'product_removed_from_cart',
    timestamp: Date.now(),
    event_attributes: {
      ...item,
      items: [item],
    },
    ids: {},
    user: {
      anonymous_id: anonymousId,
      id: event.data.user ? event.data.user.id : '',
      email: event.data.user ? event.data.user.email : '',
      created_at: event.data.user ? event.data.user.created_at : new Date().toISOString(),
      first_name: event.data.user ? event.data.user.first_name : '',
      last_name: event.data.user ? event.data.user.last_name : '',
      custom: event.data.user ? event.data.user.custom : {},
    },
    screen_resolution:
      screenContext.width && screenContext.height ? `${screenContext.width}x${screenContext.height}` : '0',
    src: 'http',
    url: documentContext.location ? documentContext.location.href.replace(regexForUrl, '') : '',
    page_title: documentContext.title || '',
    doc_path: documentContext.location
      ? documentContext.location.pathname.replace(regexForDocPath, '') +
        (documentContext.location.search ? documentContext.location.search : '')
      : '',
    doc_host: documentContext.location ? documentContext.location.hostname : '',
    doc_search: documentContext.location ? documentContext.location.search : '',
    vp_size:
      windowContext.innerWidth && windowContext.innerHeight
        ? `${windowContext.innerWidth}x${windowContext.innerHeight}`
        : '0',
    user_agent: navigatorContext.userAgent || '',
    user_language: navigatorContext.language || '',
    doc_encoding: documentContext.characterSet || 'UTF-8',
  };

  // Send the event to the Usermaven endpoint
  fetch('https://events.usermaven.com/api/v1/s2s/event?token=' + API_KEY + '.' + SERVER_TOKEN, {
    method: 'POST',
    headers: {
      'Content-Type': 'application/json',
    },
    body: JSON.stringify(payload),
    keepalive: true,
  })
    .then((response) => response.json())
    .then((data) => console.log('Usermaven event sent successfully:', data))
    .catch((error) => console.error('Error sending event to Usermaven:', error));
});
Track cart viewed
Send a custom event called "Cart Viewed" to Usermaven every time a customer views their shopping cart. Cart details including total price and items will be recorded under this event.
const API_KEY = 'API_KEY'; // Replace with your API key
const SERVER_TOKEN = 'SERVER_TOKEN'; // Replace with your SERVER TOKEN

// Utility function to read a cookie by name
function getCookie(name) {
  const value = `; ${document.cookie}`;
  const parts = value.split(`; ${name}=`);
  if (parts.length === 2) return parts.pop().split(';').shift();
  return '';
}
// Regexs for the urls
const regexForUrl = /wpm@[a-zA-Z0-9]+\/custom\/web-pixel-\d+@\d+\/sandbox\/modern\//;
const regexForDocPath = /\/wpm@[a-zA-Z0-9]+\/custom\/web-pixel-\d+@\d+\/sandbox\/modern/;

analytics.subscribe('cart_viewed', (event) => {
  // Extract cart data
  const cart = event.data.cart || {};
  const cartLines = cart.lines || [];
  const cartCost = cart.cost || {};

  // Create a cart data object
  const cartData = {
    total: cartCost.totalAmount ? cartCost.totalAmount.amount || 0 : 0,
    currency: cartCost.totalAmount ? cartCost.totalAmount.currencyCode || '' : '',
    quantity: event.data.totalQuantity,
  };

  // Create items array from cart lines
  const items = cartLines.map((line) => {
    const merchandise = line.merchandise || {};
    const product = merchandise.product || {};

    return {
      name: product.title || '',
      price: line.cost && line.cost.amountPerQuantity ? line.cost.amountPerQuantity.amount || 0 : 0,
      currency:
        line.cost && line.cost.amountPerQuantity ? line.cost.amountPerQuantity.currencyCode || '' : '',
      id: product.id || '',
      variation_id: merchandise.id || '',
      vendor: product.vendor || '',
      url: product.url || '',
      type: product.type || '',
      sku: merchandise.sku || '',
      quantity: line.quantity || 1,
      variant_title: merchandise.title || '',
      line_total: line.cost && line.cost.totalAmount ? line.cost.totalAmount.amount || 0 : 0,
    };
  });

  // Retrieve anonymous_id from the cookie
  const anonymousId = getCookie('__eventn_id_' + API_KEY) || 'default_anonymous_id';

  console.log(event);

  // Get context from the event object
  const context = event.context || {};
  const documentContext = context.document || {};
  const windowContext = context.window || {};
  const navigatorContext = context.navigator || {};
  const screenContext = windowContext.screen || {};

  // Build the payload following Usermaven API requirements
  const payload = {
    api_key: API_KEY,
    event_id: '',
    event_type: 'cart_viewed',
    timestamp: Date.now(),
    event_attributes: {
      ...cartData,
      items: items,
    },
    ids: {},
    user: {
      anonymous_id: anonymousId,
      id: event.data.user ? event.data.user.id : '',
      email: event.data.user ? event.data.user.email : '',
      created_at: event.data.user ? event.data.user.created_at : new Date().toISOString(),
      first_name: event.data.user ? event.data.user.first_name : '',
      last_name: event.data.user ? event.data.user.last_name : '',
      custom: event.data.user ? event.data.user.custom : {},
    },
    screen_resolution:
      screenContext.width && screenContext.height ? `${screenContext.width}x${screenContext.height}` : '0',
    src: 'http',
    url: documentContext.location ? documentContext.location.href.replace(regexForUrl, '') : '',
    page_title: documentContext.title || '',
    doc_path: documentContext.location
      ? documentContext.location.pathname.replace(regexForDocPath, '') +
        (documentContext.location.search ? documentContext.location.search : '')
      : '',
    doc_host: documentContext.location ? documentContext.location.hostname : '',
    doc_search: documentContext.location ? documentContext.location.search : '',
    vp_size:
      windowContext.innerWidth && windowContext.innerHeight
        ? `${windowContext.innerWidth}x${windowContext.innerHeight}`
        : '0',
    user_agent: navigatorContext.userAgent || '',
    user_language: navigatorContext.language || '',
    doc_encoding: documentContext.characterSet || 'UTF-8',
  };

  // Send the event to the Usermaven endpoint
  fetch('https://events.usermaven.com/api/v1/s2s/event?token=' + API_KEY + '.' + SERVER_TOKEN, {
    method: 'POST',
    headers: {
      'Content-Type': 'application/json',
    },
    body: JSON.stringify(payload),
    keepalive: true,
  })
    .then((response) => response.json())
    .then((data) => console.log('Usermaven event sent successfully:', data))
    .catch((error) => console.error('Error sending event to Usermaven:', error));
});
Track checkout started
Send a custom event called "Checkout Started" to Usermaven every time a customer starts the checkout process. The total price of the shopping cart will be recorded.
const API_KEY = 'API_KEY'; // Replace with your API key
const SERVER_TOKEN = 'SERVER_TOKEN'; // Replace with your SERVER TOKEN

// Utility function to read a cookie by name
function getCookie(name) {
  const value = `; ${document.cookie}`;
  const parts = value.split(`; ${name}=`);
  if (parts.length === 2) return parts.pop().split(';').shift();
  return '';
}
// Regexs for the urls
const regexForUrl = /wpm@[a-zA-Z0-9]+\/custom\/web-pixel-\d+@\d+\/sandbox\/modern\//;
const regexForDocPath = /\/wpm@[a-zA-Z0-9]+\/custom\/web-pixel-\d+@\d+\/sandbox\/modern/;

analytics.subscribe('checkout_started', (event) => {
  // Extract checkout data
  const checkout = event.data.checkout || {};
  const lineItems = checkout.lineItems || [];
  const discountApplications = checkout.discountApplications || [];

  // Extract discount codes
  const discountCodes = discountApplications
    .filter((discount) => discount.type === 'DISCOUNT_CODE')
    .map((discount) => discount.title || '')
    .filter((code) => code !== '');

  // Create a checkout data object
  const checkoutData = {
    total: checkout.totalPrice?.amount || 0,
    currency: checkout.totalPrice?.currencyCode || '',
    subtotal: checkout.subtotalPrice?.amount || 0,
    tax: checkout.totalTax?.amount || 0,
    shipping_total: checkout.totalShippingPrice?.amount || 0,
    discount_total: checkout.totalDiscounts?.amount || 0,
    items_count: lineItems.length || 0,
  };

  // Create items array from line items
  const items = lineItems.map((item) => {
    // Calculate item discount if available
    const itemDiscount = (item.discountAllocations || []).reduce(
      (total, allocation) => total + (allocation.amount || 0),
      0
    );

    return {
      name: item.title || '',
      price: item.originalUnitPrice?.amount || 0,
      discounted_price: item.discountedUnitPrice?.amount || 0,
      currency: item.originalUnitPrice?.currencyCode || '',
      id: item.variant?.product?.id || '',
      variation_id: item.variant?.id || '',
      vendor: item.variant?.product?.vendor || '',
      sku: item.variant?.sku || '',
      quantity: item.quantity || 1,
      variant_title: item.variant?.title || '',
      line_total: item.originalTotalPrice?.amount || 0,
    };
  });

  // Retrieve anonymous_id from the cookie
  const anonymousId = getCookie('__eventn_id_' + API_KEY) || 'default_anonymous_id';

  console.log(event);

  // Get context from the event object
  const context = event.context || {};
  const documentContext = context.document || {};
  const windowContext = context.window || {};
  const navigatorContext = context.navigator || {};
  const screenContext = windowContext.screen || {};

  // Build the payload following Usermaven API requirements
  const payload = {
    api_key: API_KEY,
    event_id: '',
    event_type: 'checkout_started',
    timestamp: Date.now(),
    event_attributes: {
      ...checkoutData,
      items: items,
    },
    ids: {},
    user: {
      anonymous_id: anonymousId,
      id: event.data.user ? event.data.user.id : '',
      email: checkout.email || (event.data.user ? event.data.user.email : ''),
      created_at: event.data.user ? event.data.user.created_at : new Date().toISOString(),
      first_name: event.data.user ? event.data.user.first_name : '',
      last_name: event.data.user ? event.data.user.last_name : '',
      custom: event.data.user ? event.data.user.custom : {},
    },
    screen_resolution:
      screenContext.width && screenContext.height ? `${screenContext.width}x${screenContext.height}` : '0',
    src: 'http',
    url: documentContext.location ? documentContext.location.href.replace(regexForUrl, '') : '',
    page_title: documentContext.title || '',
    doc_path: documentContext.location
      ? documentContext.location.pathname.replace(regexForDocPath, '') +
        (documentContext.location.search ? documentContext.location.search : '')
      : '',
    doc_host: documentContext.location ? documentContext.location.hostname : '',
    doc_search: documentContext.location ? documentContext.location.search : '',
    vp_size:
      windowContext.innerWidth && windowContext.innerHeight
        ? `${windowContext.innerWidth}x${windowContext.innerHeight}`
        : '0',
    user_agent: navigatorContext.userAgent || '',
    user_language: navigatorContext.language || '',
    doc_encoding: documentContext.characterSet || 'UTF-8',
  };

  // Send the event to the Usermaven endpoint
  fetch('https://events.usermaven.com/api/v1/s2s/event?token=' + API_KEY + '.' + SERVER_TOKEN, {
    method: 'POST',
    headers: {
      'Content-Type': 'application/json',
    },
    body: JSON.stringify(payload),
    keepalive: true,
  })
    .then((response) => response.json())
    .then((data) => console.log('Usermaven event sent successfully:', data))
    .catch((error) => console.error('Error sending event to Usermaven:', error));
});
Track checkout address info submitted
Send a custom event called "Checkout Address Info Submitted" to Usermaven each time a customer submits their address information during checkout. Details such as address fields will be captured.
const API_KEY = 'API_KEY'; // Replace with your API key
const SERVER_TOKEN = 'SERVER_TOKEN'; // Replace with your SERVER TOKEN

// Utility function to read a cookie by name
function getCookie(name) {
  const value = `; ${document.cookie}`;
  const parts = value.split(`; ${name}=`);
  if (parts.length === 2) return parts.pop().split(';').shift();
  return '';
}
// Regexs for the urls
const regexForUrl = /wpm@[a-zA-Z0-9]+\/custom\/web-pixel-\d+@\d+\/sandbox\/modern\//;
const regexForDocPath = /\/wpm@[a-zA-Z0-9]+\/custom\/web-pixel-\d+@\d+\/sandbox\/modern/;

analytics.subscribe('checkout_address_info_submitted', (event) => {
  // Extract checkout data
  const checkout = event.data.checkout || {};
  const shippingAddress = checkout.shippingAddress || {};
  const lineItems = checkout.lineItems || [];

  // Create a checkout address info object
  const checkoutAddressData = {
    total: checkout.totalPrice?.amount || 0,
    currency: checkout.totalPrice?.currencyCode || '',
    unique_products: lineItems.length || 0,
    // Shipping address details
    shipping_address: shippingAddress.address1 || '',
    shipping_city: shippingAddress.city || '',
    shipping_country_code: shippingAddress.countryCode || '',
    shipping_zipcode: shippingAddress.zip || '',
    shipping_first_name: shippingAddress.firstName || '',
    shipping_last_name: shippingAddress.lastName || '',
  };

  // Create items array from line items
  const items = lineItems.map((item) => {
    return {
      name: item.title || '',
      price: item.originalUnitPrice?.amount || 0,
      currency: item.originalUnitPrice?.currencyCode || '',
      id: item.variant?.product?.id || '',
      variation_id: item.variant?.id || '',
      quantity: item.quantity || 1,
      line_total: item.originalTotalPrice?.amount || 0,
    };
  });

  // Retrieve anonymous_id from the cookie
  const anonymousId = getCookie('__eventn_id_' + API_KEY) || 'default_anonymous_id';

  // Get context from the event object
  const context = event.context || {};
  const documentContext = context.document || {};
  const windowContext = context.window || {};
  const navigatorContext = context.navigator || {};
  const screenContext = windowContext.screen || {};

  // Build the payload following Usermaven API requirements
  const payload = {
    api_key: API_KEY,
    event_id: '',
    event_type: 'checkout_address_info_submitted',
    timestamp: Date.now(),
    event_attributes: {
      ...checkoutAddressData,
      items: items,
    },
    ids: {},
    user: {
      anonymous_id: anonymousId,
      id: event.data.user ? event.data.user.id : '',
      email: checkout.email || (event.data.user ? event.data.user.email : ''),
      created_at: event.data.user ? event.data.user.created_at : new Date().toISOString(),
      first_name: shippingAddress.firstName || (event.data.user ? event.data.user.first_name : ''),
      last_name: shippingAddress.lastName || (event.data.user ? event.data.user.last_name : ''),
      custom: event.data.user ? event.data.user.custom : {},
      phone: shippingAddress.phone || checkout.phone || '',
    },
    screen_resolution:
      screenContext.width && screenContext.height ? `${screenContext.width}x${screenContext.height}` : '0',
    src: 'http',
    url: documentContext.location ? documentContext.location.href.replace(regexForUrl, '') : '',
    page_title: documentContext.title || '',
    doc_path: documentContext.location
      ? documentContext.location.pathname.replace(regexForDocPath, '') +
        (documentContext.location.search ? documentContext.location.search : '')
      : '',
    doc_host: documentContext.location ? documentContext.location.hostname : '',
    doc_search: documentContext.location ? documentContext.location.search : '',
    vp_size:
      windowContext.innerWidth && windowContext.innerHeight
        ? `${windowContext.innerWidth}x${windowContext.innerHeight}`
        : '0',
    user_agent: navigatorContext.userAgent || '',
    user_language: navigatorContext.language || '',
    doc_encoding: documentContext.characterSet || 'UTF-8',
  };

  // Send the event to the Usermaven endpoint
  fetch('https://events.usermaven.com/api/v1/s2s/event?token=' + API_KEY + '.' + SERVER_TOKEN, {
    method: 'POST',
    headers: {
      'Content-Type': 'application/json',
    },
    body: JSON.stringify(payload),
    keepalive: true,
  })
    .then((response) => response.json())
    .then((data) => console.log('Usermaven event sent successfully:', data))
    .catch((error) => console.error('Error sending event to Usermaven:', error));
});
Track checkout contact info submitted
Send a custom event called "Checkout Contact Info Submitted" to Usermaven whenever a customer submits contact information during checkout. Contact details will be captured.
const API_KEY = 'API_KEY'; // Replace with your API key
const SERVER_TOKEN = 'SERVER_TOKEN'; // Replace with your SERVER TOKEN

// Utility function to read a cookie by name
function getCookie(name) {
  const value = `; ${document.cookie}`;
  const parts = value.split(`; ${name}=`);
  if (parts.length === 2) return parts.pop().split(';').shift();
  return '';
}
// Regexs for the urls
const regexForUrl = /wpm@[a-zA-Z0-9]+\/custom\/web-pixel-\d+@\d+\/sandbox\/modern\//;
const regexForDocPath = /\/wpm@[a-zA-Z0-9]+\/custom\/web-pixel-\d+@\d+\/sandbox\/modern/;

analytics.subscribe('checkout_contact_info_submitted', (event) => {
  // Extract checkout data
  const checkout = event.data.checkout || {};
  const lineItems = checkout.lineItems || [];

  // Create a checkout contact info object
  const checkoutContactData = {
    total: checkout.totalPrice?.amount || 0,
    currency: checkout.totalPrice?.currencyCode || '',
    email: checkout.email || '',
    phone: checkout.phone || '',
    unique_products: lineItems.length || 0,
  };

  // Create items array from line items
  const items = lineItems.map((item) => {
    return {
      name: item.title || '',
      price: item.originalUnitPrice?.amount || 0,
      currency: item.originalUnitPrice?.currencyCode || '',
      id: item.variant?.product?.id || '',
      variation_id: item.variant?.id || '',
      quantity: item.quantity || 1,
      line_total: item.originalTotalPrice?.amount || 0,
    };
  });

  // Retrieve anonymous_id from the cookie
  const anonymousId = getCookie('__eventn_id_' + API_KEY) || 'default_anonymous_id';

  // Get context from the event object
  const context = event.context || {};
  const documentContext = context.document || {};
  const windowContext = context.window || {};
  const navigatorContext = context.navigator || {};
  const screenContext = windowContext.screen || {};

  // Build the payload following Usermaven API requirements
  const payload = {
    api_key: API_KEY,
    event_id: '',
    event_type: 'checkout_contact_info_submitted',
    timestamp: Date.now(),
    event_attributes: {
      ...checkoutContactData,
      items: items,
    },
    ids: {},
    user: {
      anonymous_id: anonymousId,
      id: event.data.user ? event.data.user.id : '',
      email: checkout.email || (event.data.user ? event.data.user.email : ''),
      created_at: event.data.user ? event.data.user.created_at : new Date().toISOString(),
      first_name: event.data.user ? event.data.user.first_name : '',
      last_name: event.data.user ? event.data.user.last_name : '',
      custom: event.data.user ? event.data.user.custom : {},
      phone: checkout.phone || '',
    },
    screen_resolution:
      screenContext.width && screenContext.height ? `${screenContext.width}x${screenContext.height}` : '0',
    src: 'http',
    url: documentContext.location ? documentContext.location.href.replace(regexForUrl, '') : '',
    page_title: documentContext.title || '',
    doc_path: documentContext.location
      ? documentContext.location.pathname.replace(regexForDocPath, '') +
        (documentContext.location.search ? documentContext.location.search : '')
      : '',
    doc_host: documentContext.location ? documentContext.location.hostname : '',
    doc_search: documentContext.location ? documentContext.location.search : '',
    vp_size:
      windowContext.innerWidth && windowContext.innerHeight
        ? `${windowContext.innerWidth}x${windowContext.innerHeight}`
        : '0',
    user_agent: navigatorContext.userAgent || '',
    user_language: navigatorContext.language || '',
    doc_encoding: documentContext.characterSet || 'UTF-8',
  };

  // Send the event to the Usermaven endpoint
  fetch('https://events.usermaven.com/api/v1/s2s/event?token=' + API_KEY + '.' + SERVER_TOKEN, {
    method: 'POST',
    headers: {
      'Content-Type': 'application/json',
    },
    body: JSON.stringify(payload),
    keepalive: true,
  })
    .then((response) => response.json())
    .then((data) => console.log('Usermaven event sent successfully:', data))
    .catch((error) => console.error('Error sending event to Usermaven:', error));
});
Track checkout completed
Send a custom event called "Checkout Completed" to Usermaven each time a customer completes a checkout. Transaction details including total revenue, products purchased, and quantities will be recorded.
const API_KEY = 'API_KEY'; // Replace with your API key
const SERVER_TOKEN = 'SERVER_TOKEN'; // Replace with your SERVER TOKEN

// Utility function to read a cookie by name
function getCookie(name) {
  const value = `; ${document.cookie}`;
  const parts = value.split(`; ${name}=`);
  if (parts.length === 2) return parts.pop().split(';').shift();
  return '';
}
// Regexs for the urls
const regexForUrl = /wpm@[a-zA-Z0-9]+\/custom\/web-pixel-\d+@\d+\/sandbox\/modern\//;
const regexForDocPath = /\/wpm@[a-zA-Z0-9]+\/custom\/web-pixel-\d+@\d+\/sandbox\/modern/;

analytics.subscribe('checkout_completed', (event) => {
  // Extract checkout data with proper error handling
  const checkout = event.data.checkout || {};
  const lineItems = checkout.lineItems || [];
  const transactions = checkout.transactions || [];
  const discountApplications = checkout.discountApplications || [];

  // Process line items
  const items = lineItems.map((item) => {
    const variant = item.variant || {};
    const product = variant.product || {};
    const discountAllocations = item.discountAllocations || [];

    return {
      product_name: item.title || '',
      unit_price: item.variant?.price?.amount || 0,
      currency: item.variant?.price?.currencyCode || '',
      product_id: product.id || '',
      variation_id: variant.id || '',
      sku: variant.sku || '',
      quantity: item.quantity || 1,
      line_total: item.originalTotalPrice?.amount || 0,
    };
  });

  // Create a checkout data object
  const checkoutData = {
    checkout_id: checkout.id || '',
    order_id: checkout.order?.id || '',
    email: checkout.email || '',
    phone: checkout.phone || '',

    // Financial details
    total: checkout.totalPrice?.amount || 0,
    subtotal: checkout.subtotalPrice?.amount || 0,
    tax: checkout.totalTax?.amount || 0,

    // Currency
    currency: checkout.totalPrice?.currencyCode || '',

    // Address information
    shipping_address: checkout.shippingAddress
      ? {
          first_name: checkout.shippingAddress.firstName || '',
          last_name: checkout.shippingAddress.lastName || '',
          address1: checkout.shippingAddress.address1 || '',
          address2: checkout.shippingAddress.address2 || '',
          city: checkout.shippingAddress.city || '',
          province: checkout.shippingAddress.province || '',
          country: checkout.shippingAddress.country || '',
          zip: checkout.shippingAddress.zip || '',
          phone: checkout.shippingAddress.phone || '',
        }
      : {},

    billing_address: checkout.billingAddress
      ? {
          first_name: checkout.billingAddress.firstName || '',
          last_name: checkout.billingAddress.lastName || '',
          address1: checkout.billingAddress.address1 || '',
          address2: checkout.billingAddress.address2 || '',
          city: checkout.billingAddress.city || '',
          province: checkout.billingAddress.province || '',
          country: checkout.billingAddress.country || '',
          zip: checkout.billingAddress.zip || '',
          phone: checkout.billingAddress.phone || '',
        }
      : {},
  };

  // Retrieve anonymous_id from the cookie
  const anonymousId = getCookie('__eventn_id_' + API_KEY) || 'default_anonymous_id';

  console.log(event);

  // Get context from the event object
  const context = event.context || {};
  const documentContext = context.document || {};
  const windowContext = context.window || {};
  const navigatorContext = context.navigator || {};
  const screenContext = windowContext.screen || {};

  // Build the payload following Usermaven API requirements
  const payload = {
    api_key: API_KEY,
    event_id: '',
    event_type: 'checkout_completed',
    timestamp: Date.now(),
    event_attributes: {
      ...checkoutData,
      items: items,
    },
    ids: {},
    user: {
      anonymous_id: anonymousId,
      id: event.data.user ? event.data.user.id : '',
      email: checkout.email || (event.data.user ? event.data.user.email : ''),
      created_at: event.data.user ? event.data.user.created_at : new Date().toISOString(),
      first_name: event.data.user
        ? event.data.user.first_name
        : checkout.shippingAddress
          ? checkout.shippingAddress.firstName
          : '',
      last_name: event.data.user
        ? event.data.user.last_name
        : checkout.shippingAddress
          ? checkout.shippingAddress.lastName
          : '',
      custom: event.data.user ? event.data.user.custom : {},
    },
    screen_resolution:
      screenContext.width && screenContext.height ? `${screenContext.width}x${screenContext.height}` : '0',
    src: 'http',
    url: documentContext.location ? documentContext.location.href.replace(regexForUrl, '') : '',
    page_title: documentContext.title || '',
    doc_path: documentContext.location
      ? documentContext.location.pathname.replace(regexForDocPath, '') +
        (documentContext.location.search ? documentContext.location.search : '')
      : '',
    doc_host: documentContext.location ? documentContext.location.hostname : '',
    doc_search: documentContext.location ? documentContext.location.search : '',
    vp_size:
      windowContext.innerWidth && windowContext.innerHeight
        ? `${windowContext.innerWidth}x${windowContext.innerHeight}`
        : '0',
    user_agent: navigatorContext.userAgent || '',
    user_language: navigatorContext.language || '',
    doc_encoding: documentContext.characterSet || 'UTF-8',
  };

  // Send the event to the Usermaven endpoint
  fetch('https://events.usermaven.com/api/v1/s2s/event?token=' + API_KEY + '.' + SERVER_TOKEN, {
    method: 'POST',
    headers: {
      'Content-Type': 'application/json',
    },
    body: JSON.stringify(payload),
    keepalive: true,
  })
    .then((response) => response.json())
    .then((data) => console.log('Usermaven event sent successfully:', data))
    .catch((error) => console.error('Error sending event to Usermaven:', error));
});
Track checkout address info submitted
Send a custom event called "Checkout Address Info Submitted" to Usermaven each time a customer submits their address information during checkout. Details such as address fields will be captured.
const API_KEY = 'API_KEY'; // Replace with your API key
const SERVER_TOKEN = 'SERVER_TOKEN'; // Replace with your SERVER TOKEN

// Utility function to read a cookie by name
function getCookie(name) {
  const value = `; ${document.cookie}`;
  const parts = value.split(`; ${name}=`);
  if (parts.length === 2) return parts.pop().split(';').shift();
  return '';
}
// Regexs for the urls
const regexForUrl = /wpm@[a-zA-Z0-9]+\/custom\/web-pixel-\d+@\d+\/sandbox\/modern\//;
const regexForDocPath = /\/wpm@[a-zA-Z0-9]+\/custom\/web-pixel-\d+@\d+\/sandbox\/modern/;

analytics.subscribe('checkout_address_info_submitted', (event) => {
  // Extract checkout data
  const checkout = event.data.checkout || {};
  const shippingAddress = checkout.shippingAddress || {};
  const lineItems = checkout.lineItems || [];

  // Create a checkout address info object
  const checkoutAddressData = {
    total: checkout.totalPrice?.amount || 0,
    currency: checkout.totalPrice?.currencyCode || '',
    unique_products: lineItems.length || 0,
    // Shipping address details
    shipping_address: shippingAddress.address1 || '',
    shipping_city: shippingAddress.city || '',
    shipping_country_code: shippingAddress.countryCode || '',
    shipping_zipcode: shippingAddress.zip || '',
    shipping_first_name: shippingAddress.firstName || '',
    shipping_last_name: shippingAddress.lastName || '',
  };

  // Create items array from line items
  const items = lineItems.map((item) => {
    return {
      name: item.title || '',
      price: item.originalUnitPrice?.amount || 0,
      currency: item.originalUnitPrice?.currencyCode || '',
      id: item.variant?.product?.id || '',
      variation_id: item.variant?.id || '',
      quantity: item.quantity || 1,
      line_total: item.originalTotalPrice?.amount || 0,
    };
  });

  // Retrieve anonymous_id from the cookie
  const anonymousId = getCookie('__eventn_id_' + API_KEY) || 'default_anonymous_id';

  // Get context from the event object
  const context = event.context || {};
  const documentContext = context.document || {};
  const windowContext = context.window || {};
  const navigatorContext = context.navigator || {};
  const screenContext = windowContext.screen || {};

  // Build the payload following Usermaven API requirements
  const payload = {
    api_key: API_KEY,
    event_id: '',
    event_type: 'checkout_address_info_submitted',
    timestamp: Date.now(),
    event_attributes: {
      ...checkoutAddressData,
      items: items,
    },
    ids: {},
    user: {
      anonymous_id: anonymousId,
      id: event.data.user ? event.data.user.id : '',
      email: checkout.email || (event.data.user ? event.data.user.email : ''),
      created_at: event.data.user ? event.data.user.created_at : new Date().toISOString(),
      first_name: shippingAddress.firstName || (event.data.user ? event.data.user.first_name : ''),
      last_name: shippingAddress.lastName || (event.data.user ? event.data.user.last_name : ''),
      custom: event.data.user ? event.data.user.custom : {},
      phone: shippingAddress.phone || checkout.phone || '',
    },
    screen_resolution:
      screenContext.width && screenContext.height ? `${screenContext.width}x${screenContext.height}` : '0',
    src: 'http',
    url: documentContext.location ? documentContext.location.href.replace(regexForUrl, '') : '',
    page_title: documentContext.title || '',
    doc_path: documentContext.location
      ? documentContext.location.pathname.replace(regexForDocPath, '') +
        (documentContext.location.search ? documentContext.location.search : '')
      : '',
    doc_host: documentContext.location ? documentContext.location.hostname : '',
    doc_search: documentContext.location ? documentContext.location.search : '',
    vp_size:
      windowContext.innerWidth && windowContext.innerHeight
        ? `${windowContext.innerWidth}x${windowContext.innerHeight}`
        : '0',
    user_agent: navigatorContext.userAgent || '',
    user_language: navigatorContext.language || '',
    doc_encoding: documentContext.characterSet || 'UTF-8',
  };

  // Send the event to the Usermaven endpoint
  fetch('https://events.usermaven.com/api/v1/s2s/event?token=' + API_KEY + '.' + SERVER_TOKEN, {
    method: 'POST',
    headers: {
      'Content-Type': 'application/json',
    },
    body: JSON.stringify(payload),
    keepalive: true,
  })
    .then((response) => response.json())
    .then((data) => console.log('Usermaven event sent successfully:', data))
    .catch((error) => console.error('Error sending event to Usermaven:', error));
});
Track collection viewed
const API_KEY = 'API_KEY'; // Replace with your API key
const SERVER_TOKEN = 'SERVER_TOKEN'; // Replace with your SERVER TOKEN

// Utility function to read a cookie by name
function getCookie(name) {
  const value = `; ${document.cookie}`;
  const parts = value.split(`; ${name}=`);
  if (parts.length === 2) return parts.pop().split(';').shift();
  return '';
}
// Regexs for the urls
const regexForUrl = /wpm@[a-zA-Z0-9]+\/custom\/web-pixel-\d+@\d+\/sandbox\/modern\//;
const regexForDocPath = /\/wpm@[a-zA-Z0-9]+\/custom\/web-pixel-\d+@\d+\/sandbox\/modern/;

analytics.subscribe('collection_viewed', (event) => {
  // Extract collection data
  const collection = event.data.collection || {};
  const productVariants = collection.productVariants || [];

  // Create a collection item object
  const collectionData = {
    collection_id: collection.id || '',
    name: collection.title || '',
    url: collection.url || '',
    description: collection.description || '',
    products_count: productVariants.length || 0,
  };

  // Create items array from product variants if available
  const items = productVariants
    .map((variant) => {
      const product = variant.product || {};
      return {
        name: product.title || '',
        price: variant.price?.amount || 0,
        currency: variant.price?.currencyCode || '',
        id: product.id || '',
        variation_id: variant.id || '',
        vendor: product.vendor || '',
        url: product.url || '',
        type: product.type || '',
        sku: variant.sku || '',
      };
    })
    .slice(0, 10); // Limit to first 10 products to avoid payload size issues

  // Retrieve anonymous_id from the cookie
  const anonymousId = getCookie('__eventn_id_' + API_KEY) || 'default_anonymous_id';

  // Get context from the event object
  const context = event.context || {};
  const documentContext = context.document || {};
  const windowContext = context.window || {};
  const navigatorContext = context.navigator || {};
  const screenContext = windowContext.screen || {};

  // Build the payload following Usermaven API requirements
  const payload = {
    api_key: API_KEY,
    event_id: '',
    event_type: 'collection_viewed',
    timestamp: Date.now(),
    event_attributes: {
      ...collectionData,
      url: documentContext.location ? documentContext.location.href.replace(regexForUrl, '') : '',
      items: items.length > 0 ? items : [],
    },
    ids: {},
    user: {
      anonymous_id: anonymousId,
      id: event.data.user ? event.data.user.id : '',
      email: event.data.user ? event.data.user.email : '',
      created_at: event.data.user ? event.data.user.created_at : new Date().toISOString(),
      first_name: event.data.user ? event.data.user.first_name : '',
      last_name: event.data.user ? event.data.user.last_name : '',
      custom: event.data.user ? event.data.user.custom : {},
    },
    screen_resolution:
      screenContext.width && screenContext.height ? `${screenContext.width}x${screenContext.height}` : '0',
    src: 'http',
    url: documentContext.location ? documentContext.location.href.replace(regexForUrl, '') : '',
    page_title: documentContext.title || '',
    doc_path: documentContext.location
      ? documentContext.location.pathname.replace(regexForDocPath, '') +
        (documentContext.location.search ? documentContext.location.search : '')
      : '',
    doc_host: documentContext.location ? documentContext.location.hostname : '',
    doc_search: documentContext.location ? documentContext.location.search : '',
    vp_size:
      windowContext.innerWidth && windowContext.innerHeight
        ? `${windowContext.innerWidth}x${windowContext.innerHeight}`
        : '0',
    user_agent: navigatorContext.userAgent || '',
    user_language: navigatorContext.language || '',
    doc_encoding: documentContext.characterSet || 'UTF-8',
  };

  // Send the event to the Usermaven endpoint
  fetch('https://events.usermaven.com/api/v1/s2s/event?token=' + API_KEY + '.' + SERVER_TOKEN, {
    method: 'POST',
    headers: {
      'Content-Type': 'application/json',
    },
    body: JSON.stringify(payload),
    keepalive: true,
  })
    .then((response) => response.json())
    .then((data) => console.log('Usermaven event sent successfully:', data))
    .catch((error) => console.error('Error sending event to Usermaven:', error));
});
Track search submitted
Send a custom event called "Search Submitted" to Usermaven whenever a customer submits a search query. The search terms entered will be recorded.
const API_KEY = 'API_KEY'; // Replace with your API key
const SERVER_TOKEN = 'SERVER_TOKEN'; // Replace with your SERVER TOKEN

// Utility function to read a cookie by name
function getCookie(name) {
  const value = `; ${document.cookie}`;
  const parts = value.split(`; ${name}=`);
  if (parts.length === 2) return parts.pop().split(';').shift();
  return '';
}
// Regexs for the urls
const regexForUrl = /wpm@[a-zA-Z0-9]+\/custom\/web-pixel-\d+@\d+\/sandbox\/modern\//;
const regexForDocPath = /\/wpm@[a-zA-Z0-9]+\/custom\/web-pixel-\d+@\d+\/sandbox\/modern/;

analytics.subscribe('search_submitted', (event) => {
  // Extract search data
  const searchResult = event.data.searchResult || {};
  const productVariants = searchResult.productVariants || [];

  // Create a search data object
  const searchData = {
    query: searchResult.query || '',
    products_count: productVariants.length || 0,
  };

  // Create items array from product variants if available
  const items = productVariants
    .map((variant) => {
      const product = variant.product || {};
      return {
        name: product.title || '',
        price: variant.price?.amount || 0,
        currency: variant.price?.currencyCode || '',
        id: product.id || '',
        variation_id: variant.id || '',
        vendor: product.vendor || '',
        url: product.url || '',
        type: product.type || '',
        sku: variant.sku || '',
      };
    })
    .slice(0, 10); // Limit to first 10 products to avoid payload size issues

  // Retrieve anonymous_id from the cookie
  const anonymousId = getCookie('__eventn_id_' + API_KEY) || 'default_anonymous_id';

  console.log(event);

  // Get context from the event object
  const context = event.context || {};
  const documentContext = context.document || {};
  const windowContext = context.window || {};
  const navigatorContext = context.navigator || {};
  const screenContext = windowContext.screen || {};

  // Build the payload following Usermaven API requirements
  const payload = {
    api_key: API_KEY,
    event_id: '',
    event_type: 'search_submitted',
    timestamp: Date.now(),
    event_attributes: {
      ...searchData,
      items: items.length > 0 ? items : undefined,
    },
    ids: {},
    user: {
      anonymous_id: anonymousId,
      id: event.data.user ? event.data.user.id : '',
      email: event.data.user ? event.data.user.email : '',
      created_at: event.data.user ? event.data.user.created_at : new Date().toISOString(),
      first_name: event.data.user ? event.data.user.first_name : '',
      last_name: event.data.user ? event.data.user.last_name : '',
      custom: event.data.user ? event.data.user.custom : {},
    },
    screen_resolution:
      screenContext.width && screenContext.height ? `${screenContext.width}x${screenContext.height}` : '0',
    src: 'http',
    url: documentContext.location ? documentContext.location.href.replace(regexForUrl, '') : '',
    page_title: documentContext.title || '',
    doc_path: documentContext.location
      ? documentContext.location.pathname.replace(regexForDocPath, '') +
        (documentContext.location.search ? documentContext.location.search : '')
      : '',
    doc_host: documentContext.location ? documentContext.location.hostname : '',
    doc_search: documentContext.location ? documentContext.location.search : '',
    vp_size:
      windowContext.innerWidth && windowContext.innerHeight
        ? `${windowContext.innerWidth}x${windowContext.innerHeight}`
        : '0',
    user_agent: navigatorContext.userAgent || '',
    user_language: navigatorContext.language || '',
    doc_encoding: documentContext.characterSet || 'UTF-8',
  };

  // Send the event to the Usermaven endpoint
  fetch('https://events.usermaven.com/api/v1/s2s/event?token=' + API_KEY + '.' + SERVER_TOKEN, {
    method: 'POST',
    headers: {
      'Content-Type': 'application/json',
    },
    body: JSON.stringify(payload),
    keepalive: true,
  })
    .then((response) => response.json())
    .then((data) => console.log('Usermaven event sent successfully:', data))
    .catch((error) => console.error('Error sending event to Usermaven:', error));
});
Was this article helpful?