Conversion goals in Usermaven
A conversion goal is a specific, important action you want a user to take on your website or app. Think of it as the finish line for a user journey, such as completing a purchase, signing up for a trial, or submitting a contact form.
By setting up goals, you can measure the success of your business objectives and marketing efforts. Usermaven uses these goals to power key features like the web analytics dashboard and attribution reports, allowing you to see exactly which channels, campaigns, or content are driving valuable conversions.
You can create and manage your goals from the Conversion Goals tab on your 'Web Analytics' dashboard or directly from the 'Configure > Conversion goals' page.
Why create conversion goals?
While general metrics like pageviews are useful, they don't tell you if users are taking actions that impact your bottom line. Conversion goals help you:
Measure what matters: Track actions directly tied to business success, such as sales, sign-ups, or leads generated.
Understand user behavior: See which user paths and site elements lead to the most conversions.
Calculate marketing ROI: By connecting goals to attribution reports, you can see which channels (e.g., Google Ads, blog content, social media) provide the best return on investment.
Examples of conversion goals by business type
The right goals depend on your business model. Here are some common examples and guides on how to track the necessary events.
For an e-commerce store:
purchase_completed: A user successfully buys one or more products.added_to_cart: A user adds an item to their shopping cart.viewed_specific_product_promo: A user views the page for a specific product you are promoting.
For a SaaS or lead generation business:
demo_booked: A potential lead schedules a product demo.trial_started: A new user signs up for a free trial.form_submitted: A user fills out a contact or inquiry form.See our guides for tracking meetings with Calendlyor HubSpot. Learn how to implement purchase tracking with our Stripe tracking guide.
How to create a conversion goal
Follow these steps to set up a new goal:
Create a new conversion goal: Click the New Goal button from the 'Conversion Goals' section of your dashboard.
Name your goal: Give it a descriptive name you will easily recognize, like
SaaS Trial Sign-ups.Choose the event for your goal: This is the core of your goal. You can define a conversion based on several types of events: - Page Visit: The user visits a specific URL (e.g., a
thank-you.htmlpage after a purchase). - Pinned Event:The conversion is based on a pinned event you define from your auto-capture events. - Custom Event: The conversion is based on a custom event you send to Usermaven (e.g.,plan_upgraded). This is the most powerful option. > To learn how to send custom events from your website or app, see our Event Tracking Setup guide.**Filtering custom events by properties (Advanced)** You can make your goals even more specific by filtering a custom event by one of its properties. This allows you to track very precise actions. For example, instead of tracking every `purchase_completed` event, you could create a goal for when a *specific product* is sold by adding a filter where the event property `product_id` is equal to `your-product-sku-123`. 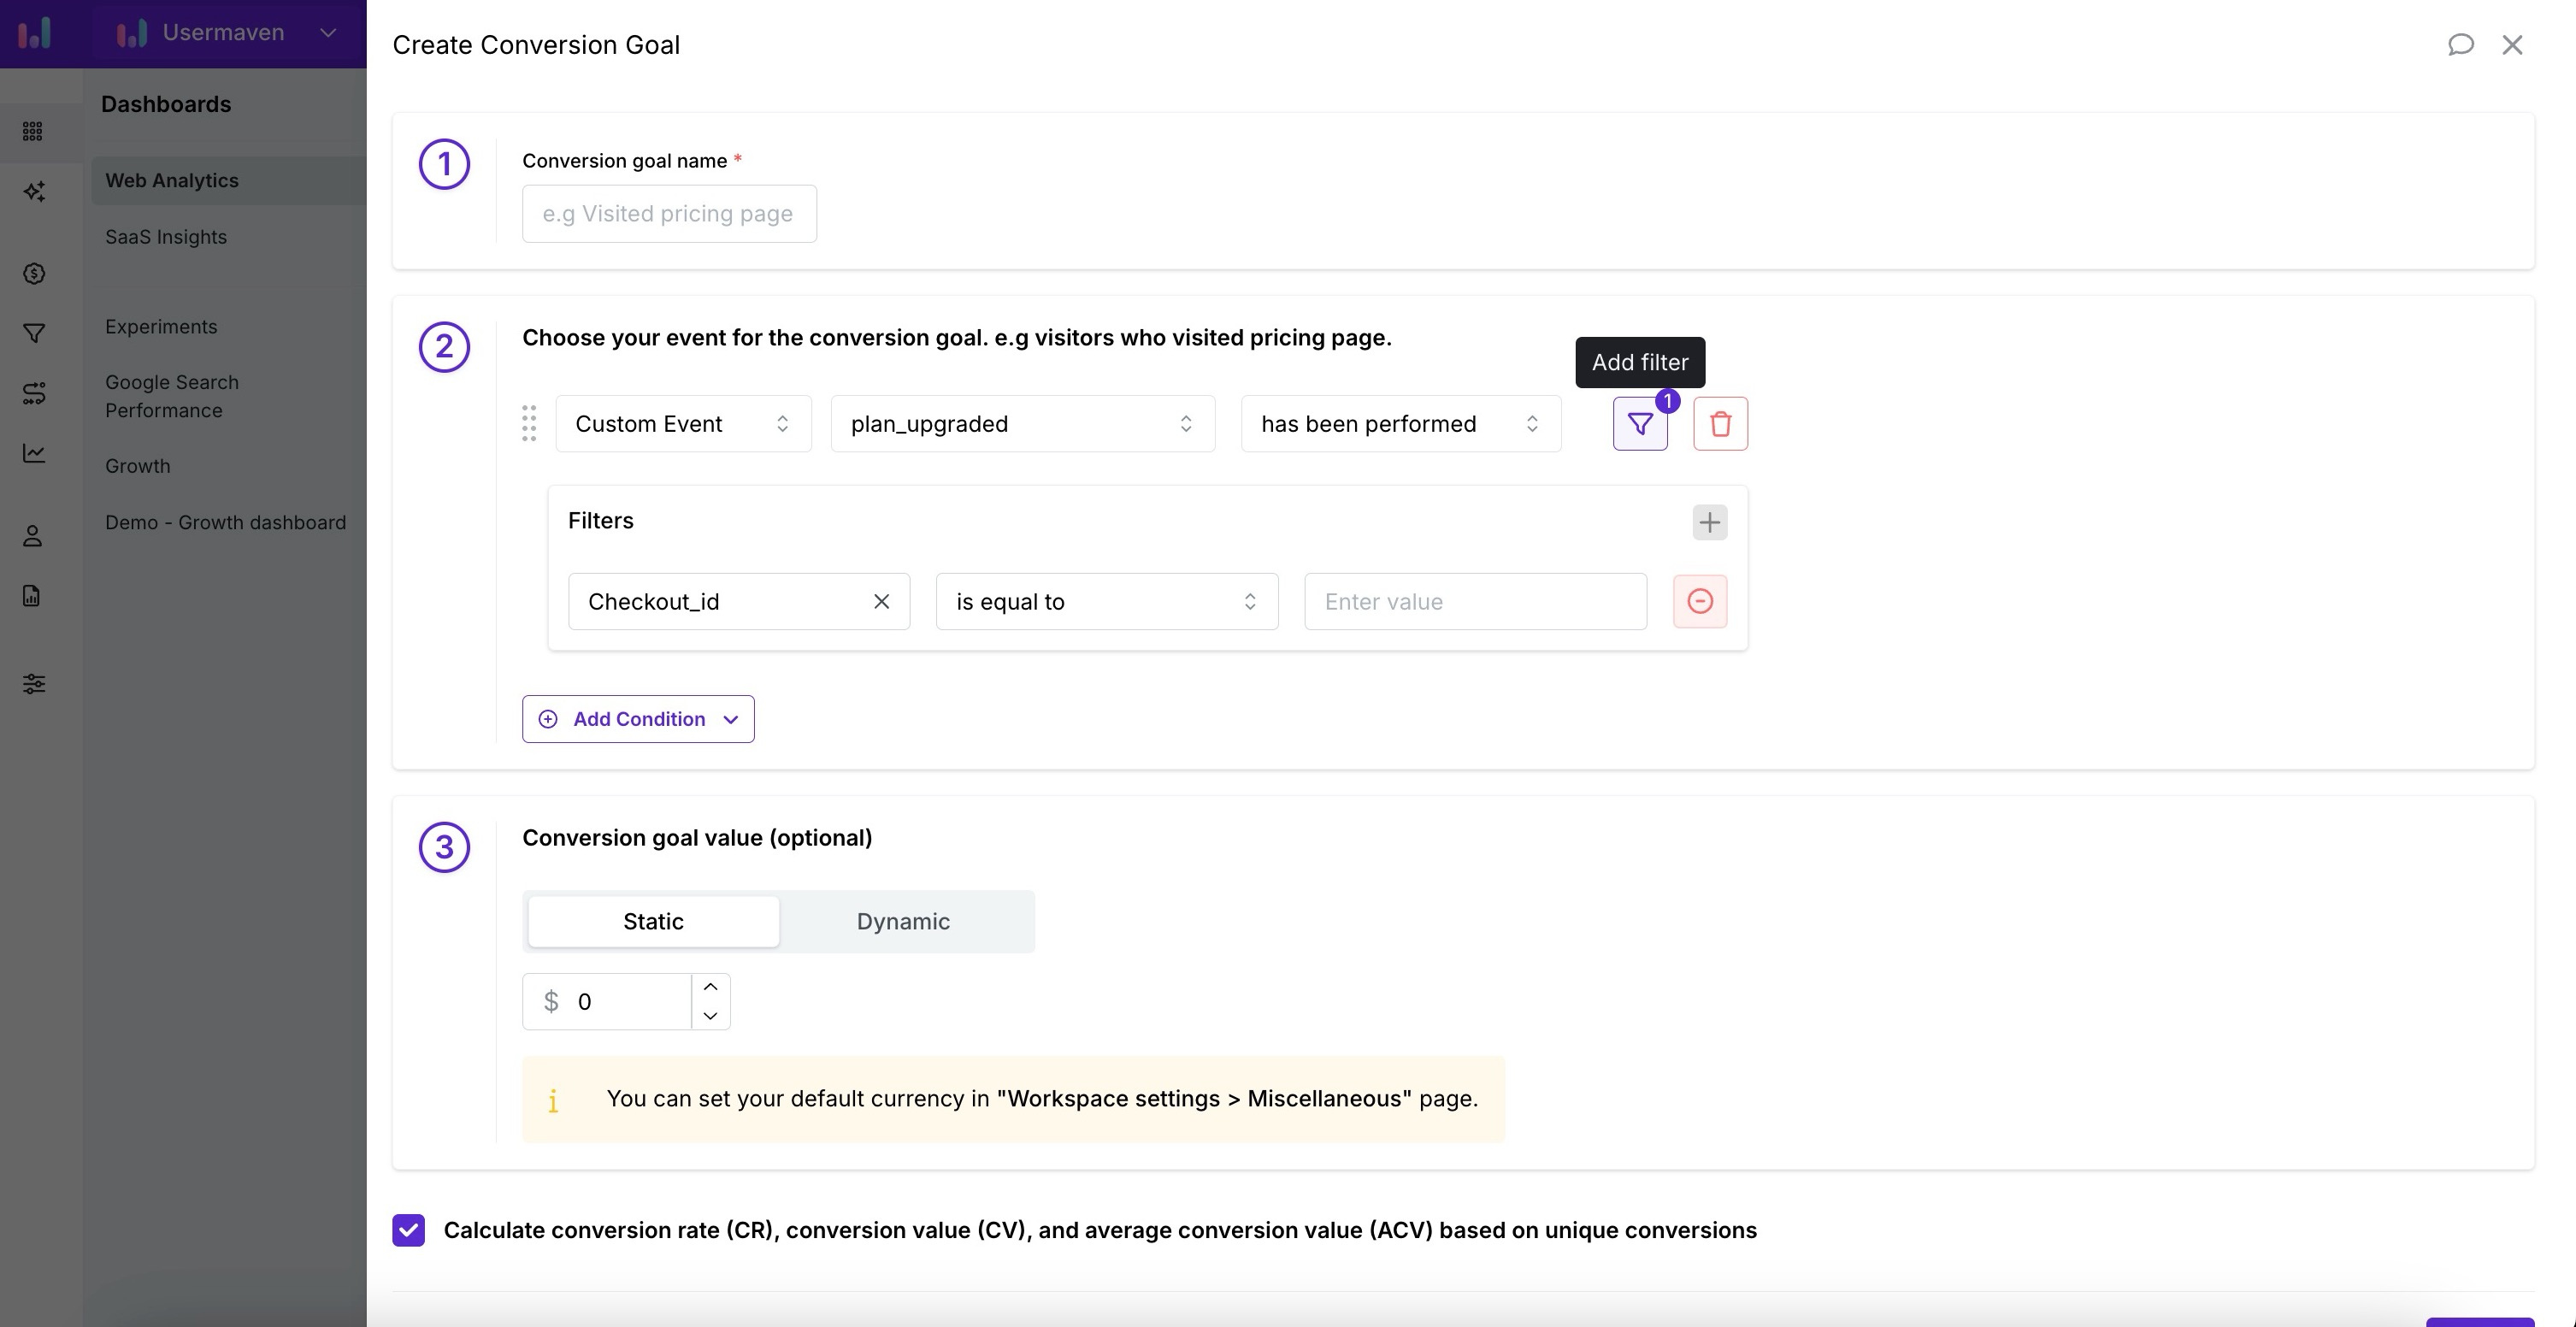
Set the conversion goal value (optional) You can assign a monetary value to each conversion.
Static: Assign a fixed value. Use this when each conversion is worth the same amount (e.g., every lead is valued at $10). Or if your not passing a customevent with value property.
Dynamic: Pull the value from a custom event property. Use this for e-commerce purchases where the total value changes with every order. The value will be taken from a numeric property you send with your event (e.g.,
priceoramount).
Note: To use dynamic values, your goal must be based on a custom event.
Multi-currency conversion (optional)
If your business operates internationally and receives payments in multiple currencies, you can enable automatic currency conversion for your dynamic conversion values. This ensures all revenue is reported consistently in your workspace's reporting currency.
How it works:
When you track a purchase event, you can include the transaction currency as an event property (e.g., currency: "EUR"). Usermaven will automatically convert this value to your reporting currency using monthly-averaged exchange rates.
Setting up multi-currency conversion:
Ensure your custom event includes both a value property (e.g.,
order_value) and a currency property (e.g.,currency).usermaven.track("purchase_completed", { order_value: 99.00, currency: "EUR", product_id: "pro-plan" });When creating or editing a conversion goal with a Dynamic value:
Select your revenue attribute (e.g.,
order_value)Select your currency attribute (e.g.,
currency)
Usermaven will convert the value to your reporting currency automatically.
Supported reporting currencies:
Multi-currency conversion is available when your reporting currency is set to one of the following:
Currency | Code |
|---|---|
US Dollar | USD |
Euro | EUR |
British Pound | GBP |
Swedish Krona | SEK |
If your reporting currency is not one of these four, the currency attribute field will be disabled, and values will be recorded as-is in your reporting currency.
Source currencies supported:
Events can be tracked in any of these 30 currencies, which will be automatically converted to your reporting currency:
Code | Currency |
|---|---|
AUD | Australian Dollar |
BRL | Brazilian Real |
CAD | Canadian Dollar |
CHF | Swiss Franc |
CNY | Chinese Renminbi Yuan |
CZK | Czech Koruna |
DKK | Danish Krone |
EUR | Euro |
GBP | British Pound |
HKD | Hong Kong Dollar |
HUF | Hungarian Forint |
IDR | Indonesian Rupiah |
ILS | Israeli New Shekel |
INR | Indian Rupee |
ISK | Icelandic Króna |
JPY | Japanese Yen |
KRW | South Korean Won |
MXN | Mexican Peso |
MYR | Malaysian Ringgit |
NOK | Norwegian Krone |
NZD | New Zealand Dollar |
PHP | Philippine Peso |
PLN | Polish Złoty |
RON | Romanian Leu |
SEK | Swedish Krona |
SGD | Singapore Dollar |
THB | Thai Baht |
TRY | Turkish Lira |
USD | United States Dollar |
ZAR | South African Rand |
Note: If a currency code is missing or invalid in an event, the value will be recorded without conversion (assumed to already be in the reporting currency).
Tip: You can set your reporting currency in Workspace Settings > Reporting
Calculate unique conversions (optional) Check the box at the bottom if you want to count each user only once within the selected date range, even if they complete the action multiple times.
Leave unchecked for: Actions you want to count every time, like purchases or downloads.
Check for: One-time actions like a trial sign-up or newsletter subscription.
Using your conversion goals
Once your goal is created and starts receiving data, you can:
Filter dashboards: Click on any goal in the 'Conversion Goals' list to filter your entire Web Analytics dashboard. This shows you the user journey, top sources, and demographics specifically for users who converted.
Analyze attribution reports: Use your conversion goals in the attribution reports to see which marketing channels, campaigns, referrers, or content are most effective at driving your most important business outcomes.
Managing your goals
You can easily edit or delete a goal at any time. From the 'Conversion Goals' list, simply hover over the goal you wish to change and click the pencil icon (to edit) or the trash icon (to delete).
Additional tracking guides
Tracking simple clicks without code: For tracking conversions on simple button or element clicks, like a "Request a Demo" button, you can use Pinned Events as a quick, no-code alternative to sending custom events. Please see our pinned events guide.
Tracking embedded widgets: Many third-party tools (like booking forms or help widgets) run inside an iframe. To track events within these elements, please see our guide to tracking iframe widgets.
Was this article helpful?